
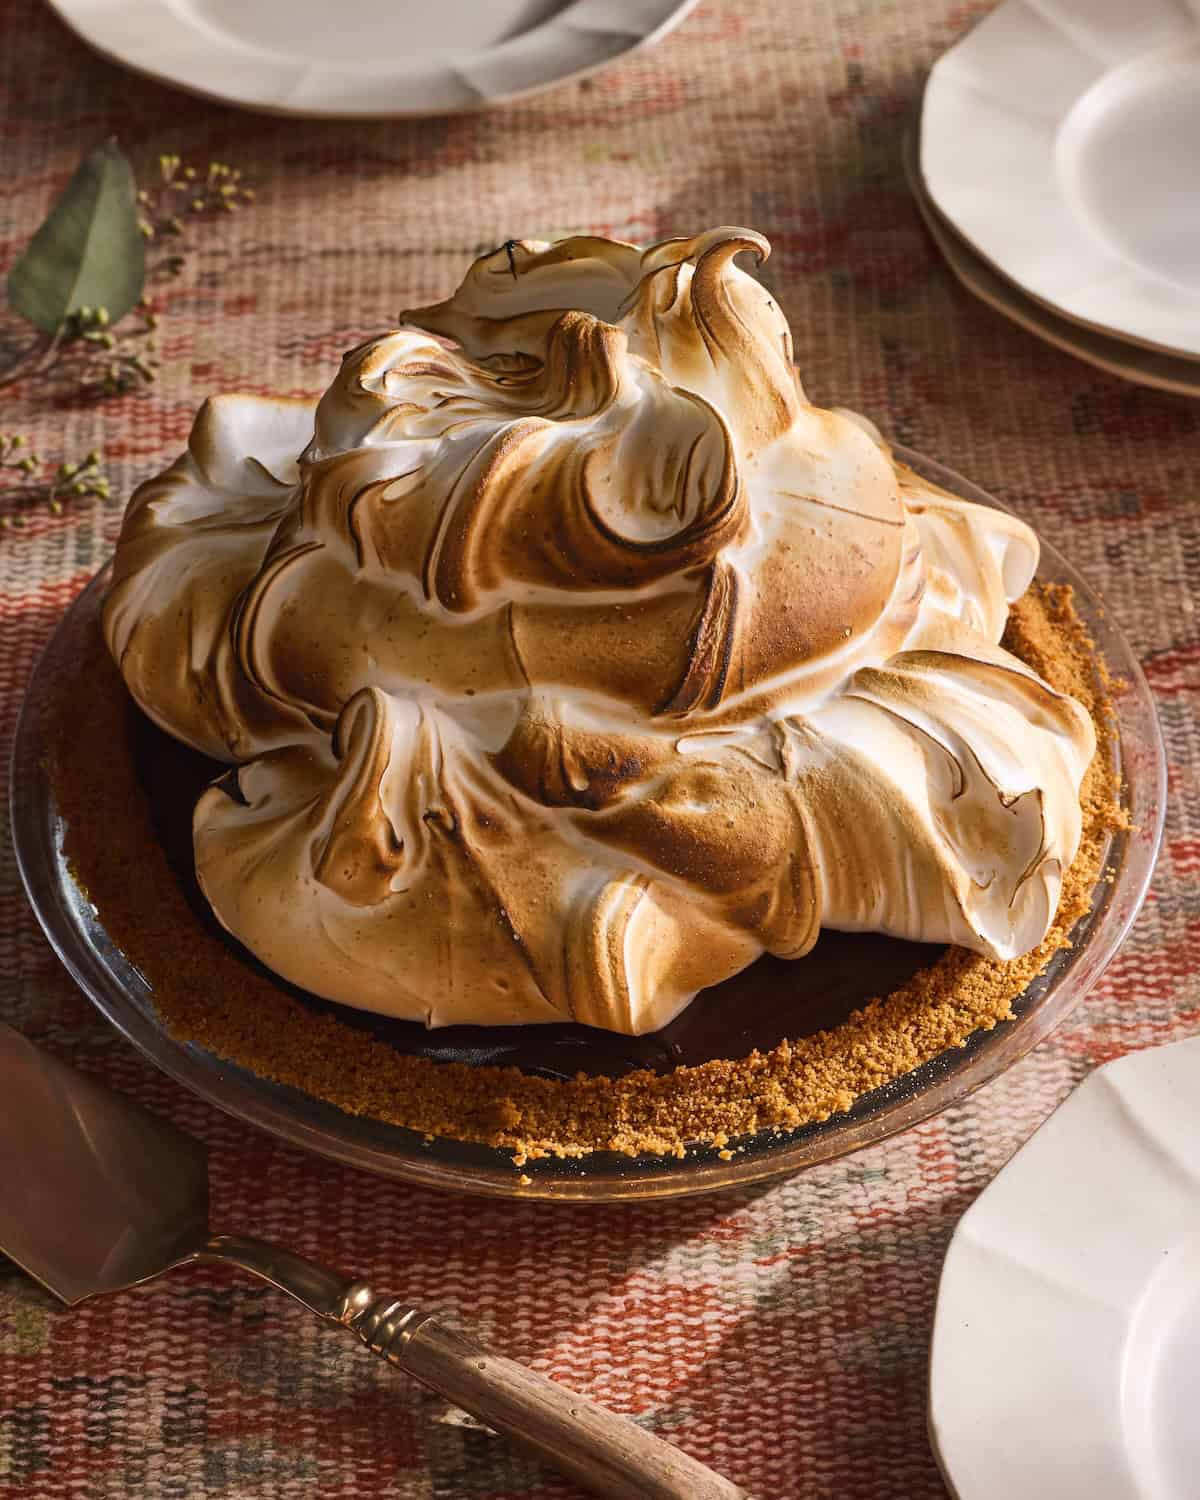
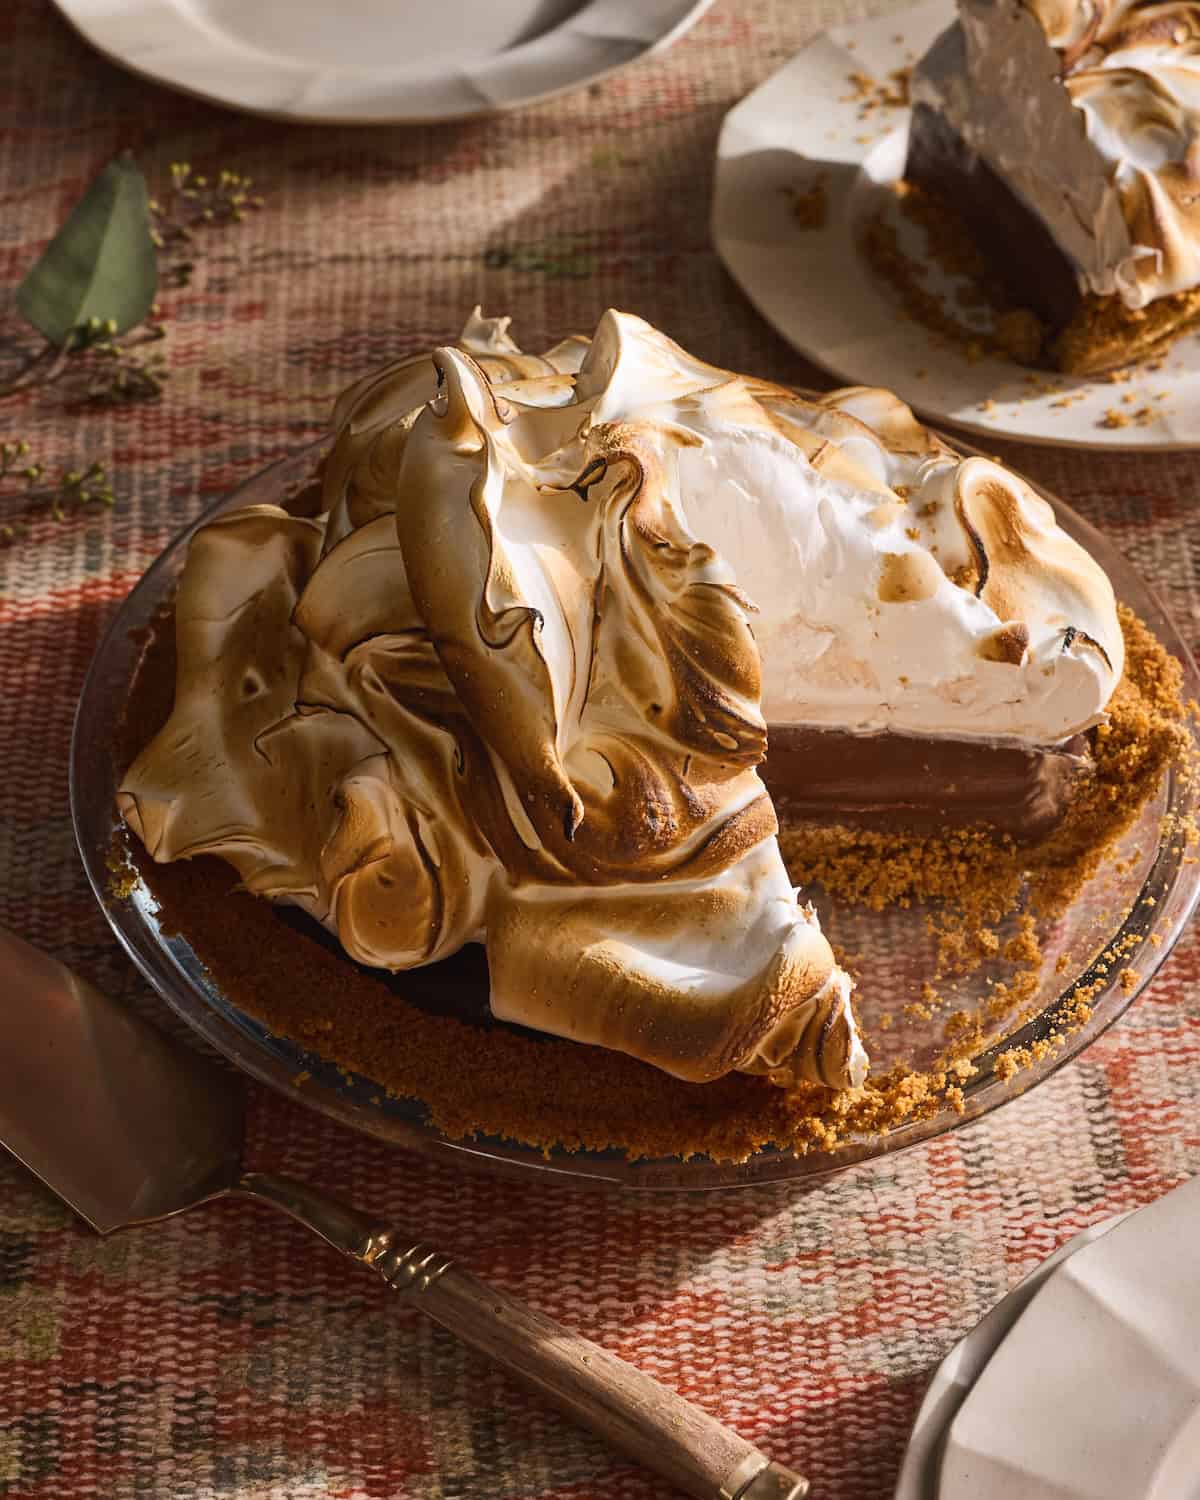
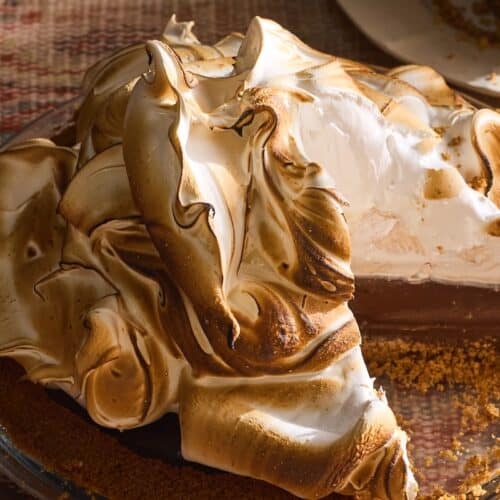
If you love s’mores and you love pudding, this S’more Pudding Pie is about to rock your world. It's got chocolate, graham crackers, and marshmallows and comes in pie form. Basically the grown up version of the campfire classic and an instant way to win everyone over at this years Holiday dinners!
If you love this dessert, you MUST to try a few of my other crowd-pleasing sweets like my Chocolate Brownie Pudding, S’more Butterscotch Caramel Dump Cake, these S’more Cheesecake Pops, S'more Blondies, and my Classic Chocolate Chip Cookies.
S'more Pudding Pie at a Glance
- 🕒 Total Time: 2 hours 40 minutes
- 👪 Servings: 10
- 🍝 Cuisine Type: American / Dessert Pie
- 🧂 Flavor Profile: Buttery graham cracker crust, rich homemade chocolate pudding, and a toasted marshmallow meringue top — nostalgic but elevated
- 📖 Dietary Info: Contains dairy, eggs, gluten; not freezer-friendly
- 📦 Storage Notes: Chill in the refrigerator; do not freeze; add the meringue right before serving
- ⭐ Why You’ll Love It: A show-stopping, grown-up take on s’mores that’s creamy, chocolatey, toasty and perfect for holiday dessert tables
Summarize and save this recipe on
Jump to:
Why I love this recipe
I am always obsessed with desserts that feel nostalgic but still a little elevated, and this S’more Pudding Pie checks every box. You get the buttery graham cracker crust, the richest homemade chocolate pudding, and a cloud of marshmallow meringue that gets perfectly toasted on top. It is simple to make, wildly impressive, and the kind of dessert people will talk about long after the last slice is gone.
10 Tips + Tricks for the Best S’more Pudding Pie
- Use a sturdy graham crust. Press it really firmly into the pan (bottom + sides) so it doesn’t crumble when sliced. A measuring cup works like a dream to pack it tight.
- Bake the crust until it smells nutty. Even if the box says you don’t have to bake it, do it anyway. A quick bake gives you that toasty, golden, s’mores-vibe flavor.
- Whisk the pudding constantly. Low and slow is the move. Constant whisking keeps the chocolate pudding smooth and velvety, not lumpy or chalky.
- Use high-quality chocolate. A good bittersweet or semisweet bar melts smoother and tastes way richer than basic chips. It’s worth it trust.
- Cool the pudding before filling the crust. Not room temperature, but not steaming hot either. Warm pudding can crack the crust or make it soggy. Give it a chance to chill out.
- Chill the whole pie long enough. The pudding needs time to fully set, think a few hours or even overnight. This is how you get those clean, dreamy slices.
- Toast the marshmallows right before serving. Whether you use a kitchen torch or broil for a few seconds, fresh-toasted marshmallow meringue taste insane and give you the real campfire moment.
- Slice the S'more Pudding Pie with a hot knife. Run your knife under hot water, wipe it dry, and each slice will cut through the marshmallow layer like butter.
- Serve S'more Pudding Pie slightly chilled. Straight-from-the-fridge is great for clean cuts, but letting it sit for 10–15 minutes before eating makes the chocolate extra silky and the marshmallow soft again.
Substitutions and Swaps
🍫 Chocolate Swaps
- Semi-sweet chocolate chips — classic and balanced.
- Dark chocolate — for a richer, less sweet pie.
- Milk chocolate — if you want that nostalgic s’mores flavor.
- White chocolate or peanut butter chips — for a twist on tradition.
🍪 Crust Options
- Graham cracker crust — the classic move.
- Oreo crust — for a cookies-and-cream vibe.
- Biscoff or digestive biscuits — adds a caramel-y, spiced note.
- Pretzel crust — for a salty-sweet balance that’s next level.
- Gluten-free grahams — if you’re keeping things GF.
🥛 Filling Variations
- Whole milk — makes the pudding silky smooth.
- Half-and-half or heavy cream — for extra richness.
- Coconut milk — dairy-free and gives a tropical undertone.
- Instant pudding mix — works in a pinch, just use less milk so it sets up firm.
☁️ Topping Swaps
- Marshmallow fluff — quick and spreadable.
- Whipped cream or meringue — if you want something lighter.
- Crumbled graham crackers, shaved chocolate, or sea salt — for texture and contrast.
🍬 Fun Add-Ins
- Peanut butter or Nutella swirl — because obviously.
- Espresso powder — deepens the chocolate flavor.
- Crushed toffee or caramel drizzle — for a sweet-salty upgrade.
- Mini chocolate bars or chunks — for that true s’mores bite.
Can I make S'more Pudding Pie ahead of time?
Yes. You can make the crust and pudding layer up to 24 hours in advance. Add and torch the meringue right before serving.
Can I use store bought pudding for S'more Pudding Pie?
I would not recommend it. The homemade pudding is what makes this pie extra special and it comes together quickly.
How to toast marsmallows without a torch?
Pop the pie under the broiler for 20 to 30 seconds, watching it closely so it does not burn.
Can I freeze this S'more Pudding Pie?
No. The pudding and meringue will not freeze well. Chill it in the fridge only.
S’more Pudding Pie
Ingredients
For the Graham Cracker Crust
- 2 cups graham cracker crumbs
- 2 tablespoons sugar
- 1 pinch salt
- 10 tablespoons unsalted butter melted
For the Chocolate Pudding Filling
- 1 cup packed brown sugar
- ½ cup cocoa powder
- ⅓ cup cornstarch
- ½ teaspoon sea salt
- 3 cups whole milk
- 4 ounces dark chocolate
- 1 tablespoon butter
- 2 teaspoon vanilla extract
For the Marshmallow Meringue
- 5 egg whites
- ½ cup light corn syrup plus 2 tablespoons
- 1 ¾ cup white sugar
- 2 teaspoons vanilla extract
Instructions
For the Graham Cracker Crust
- Preheat the oven to 350 degrees F.
- In a large bowl, combine the graham cracker crumbs, sugar and salt. Stir in the melted butter until everything is evenly coated.
- Press the mixture firmly into a 9 inch pie dish, making sure the bottom and sides are packed tightly. Bake for 12 to 15 minutes until golden brown. Remove from the oven and let it cool completely.
For the Chocolate Pudding Filling
- In a medium saucepan, whisk together the brown sugar, cocoa powder, cornstarch and salt. Add the milk and continue whisking until smooth.
- Cook over medium low heat for about 10 minutes until thickened. Bring the mixture to a gentle simmer, reduce the heat to low and cook for 2 more minutes, whisking constantly, until very thick.
- Remove from the heat and stir in the dark chocolate, butter and vanilla. Mix until smooth. Pour the pudding into the cooled crust and refrigerate for 2 hours to set.
For the Marshmallow Meringue
- In a heatproof bowl, whisk together the egg whites, corn syrup and sugar. Set the bowl over a pot of simmering water and whisk for 5 minutes until the sugar dissolves.
- Transfer the mixture to a stand mixer and whip on high speed for 5 minutes until stiff peaks form. Add the vanilla and fold to combine.
- Carefully mound the meringue onto the chilled pie. Use a kitchen torch to toast the outside of the meringue until golden and toasty. Slice and serve.
Notes
- Use a sturdy graham crust. Press it really firmly into the pan (bottom + sides) so it doesn’t crumble when sliced. A measuring cup works like a dream to pack it tight.
- Bake the crust until it smells nutty. Even if the box says you don’t have to bake it, do it anyway. A quick bake gives you that toasty, golden, s’mores-vibe flavor.
- Whisk the pudding constantly. Low and slow is the move. Constant whisking keeps the chocolate pudding smooth and velvety, not lumpy or chalky.
- Use high-quality chocolate. A good bittersweet or semisweet bar melts smoother and tastes way richer than basic chips. It’s worth it trust.
- Cool the pudding before filling the crust. Not room temperature, but not steaming hot either. Warm pudding can crack the crust or make it soggy. Give it a chance to chill out.
- Chill the whole pie long enough. The pudding needs time to fully set, think a few hours or even overnight. This is how you get those clean, dreamy slices.
- Toast the marshmallows right before serving. Whether you use a kitchen torch or broil for a few seconds, fresh-toasted marshmallows taste insane and give you the real campfire moment.
- Slice with a hot knife. Run your knife under hot water, wipe it dry, and each slice will cut through the marshmallow layer like butter.
- Serve it slightly chilled. Straight-from-the-fridge is great for clean cuts, but letting it sit for 10–15 minutes before eating makes the chocolate extra silky and the marshmallow soft again.
Nutrition Information (estimated)
Photo by Matt Armendariz / Food Styling by Adam Pearson / Recipe by What’s Gaby Cooking


Can this be made ahead of time? Like a day before or is it make and eat immediately? Thanks!
you can make the base ahead of time - but I wouldn't do the topping until day of
I made this twice over the thanksgiving holiday, once for my in-laws thanksgiving and once for mine- turned out amazing. Just a couple of tips I learned after making it the first time i'll take with me when I make it again:
1) The topping is super sweet and there is a lot of it, the 2nd time I made it I used 3 egg whites instead of 5 and cut everything by half and left out some of the sugar. The first time I made it with a full recipe people were leaving half slices on their plates because it was just too rich for right after a big meal. I also forgot the vanilla on the first and remembered for the second--the vanilla definitely adds something.
2) I made the mistake of putting the whole thing together and torching it before taking it in the car for an hour drive---mistake. Definitely make the topping at home because it's messy, but assemble and torch onsite, with mine I had to put saran wrap over it to travel and was hard to get off and took some of the burnt parts.
Overall amazing pie- I will definitely make again! Thanks Gaby!
Hi Gaby, I saw your comment above about making it ahead. If I wanted to take this to someone's home on thanksgiving should I make the meringue before we leave and take it in a separate container with us or would I actually need to mix the meringue at their home right before serving?
make it before you leave and pack it separately! assemble and torch when you get there!
Hi, This looks amazing! Can it be made in advance? And if so, how would you store it? Thank you!
you could make the bottom portion in advance and store it in the fridge - I wouldnt add the meringue topping until right before serving though and torch it then!
Sooooo... I guess by taking down my comment about corn syrup, of which was NOT meant to be a criticism, but mostly a commentary, and one to help others while making your recipe, you only keep the "good" comments. Seems a little false... Too bad
Hi Shirell,
I definitely didn't take it down. I would never take down a comment that could help someone down the road. I hadn't logged into my site to approve comments and seeing as how this was the first comment you've ever left I have to approve it to avoid any spam comments. If you look, you'll see it right above this. Have a great day and I'm glad your daughter enjoyed it. Cheers.
My daughter wanted this pie desperately, so I made it!!!! All in all it was a good recipe, but I had to write and let you know my experience with the meringue section: I made it exactly as written, and it came out as a soup!!!! It was a runny mess! I realized that the corn syrup made it this way... Had I simply omitted it, it would've been perfect. I will make make it again... Very tasty recipe ( with all that sugar, it should be!!) but the meringue will only consistent of egg whites and sugar... Zero corn syrup!!!!!!!!
Do you think one could replace the marshmallow meringue with marshmallow fluff?
yes you absolutely could!! It just might be a bit tricky to make it into a pretty shape. So if you do that, be sure to use a spatula that you've buttered or sprayed with non stick baking spray so that you have an easy time putting it together 🙂
Your meringue is beautiful and the combination is gret.
Genius! This sounds so amazing -- can't wait to try it!
This smores pie looks so delicious
It's official - you win the award for most beautiful pie photo EVER!
This pie is calling to me! What an incredible combination, and I can't wait to try it!
This smores pudding pie is all I am craving right now, it looks SO delicious!
have i mentioned that this is absolutely AMAZING!!!!??? giiirrrlll you nailed it! i love you i miss you!
Girl, omg, omg omg! This friggin pie looks absolutely insane! Definitely pinned so I can try it asap!