
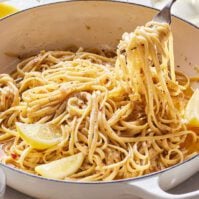
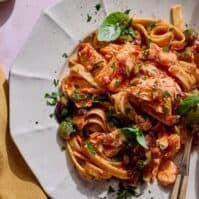
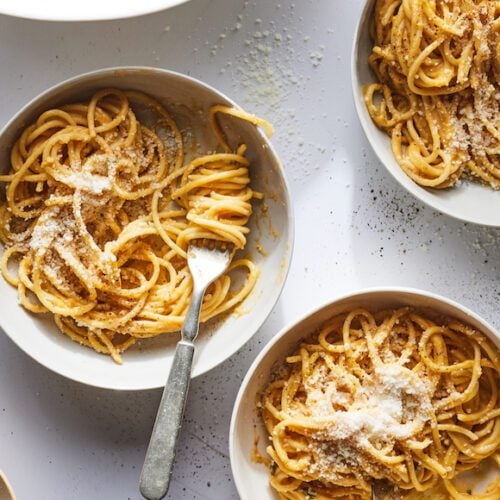
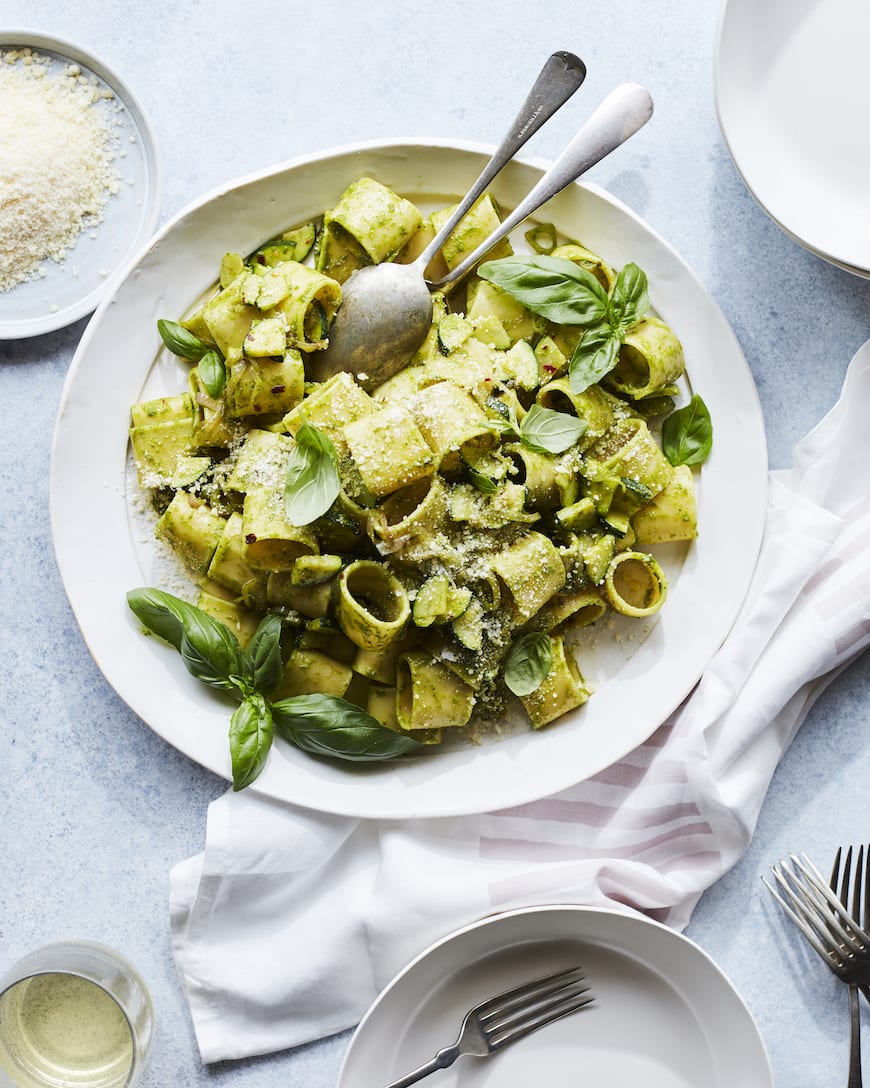
It's pasta night and this Creamy Butternut Squash Pasta is a total game-changer. Tender roasted butternut squash transforms into a silky sauce that coats spaghetti in true creamy comfort. Between this and the Butternut Squash Lasagna and the Butternut Squash Carrot Soup, I've got your squash needs covered. And for another pasta night favorite, my Lemon Spaghetti is the bright and lemony counterpart to this cozy fall bowl.

Whether you’re craving a cozy mid-week dinner or a show-stopping weekend meal, this butternut squash pasta is easy enough for the family, elegant enough to serve guests, and totally worthy of being in your weekly rotation. Grab your favorite bowl, twist that fork through the sauce, and let’s celebrate squash season in full carb glory. I also think it pairs exceptionally well with my favorite garlic bread recipe.
Creamy Butternut Squash Pasta at a Glance
- 🕒 Total Time: 45 minutes (10 min prep + 35 min cook)
- 👪 Servings: 6
- 🍝 Cuisine Type: Italian / American Fall Comfort
- 🧂 Flavor Profile: Roasted butternut squash and shallots blended into a silky sauce with nutmeg, creamy, rich yet subtly sweet and savory
- 📖 Dietary Info: Contains dairy (heavy cream, pecorino/cheese), eggs (pasta), gluten (pasta) — can be adapted dairy-free by swapping coconut milk for cream
- 📦 Storage Notes: Refrigerate in an airtight container for up to 3-5 days; freezes well (sauce or pasta) up to ~2-3 months when properly stored.
- ⭐ Why You’ll Love It: A luxurious fall pasta that turns humble squash into a creamy sauce worthy of company—easy enough for a weeknight but special enough for guests.
Why I love this recipe
I’m a pasta girl through and through, and this creamy butternut squash pasta is one of my absolute fall favorites. It’s cozy, comforting, and the perfect mix of savory and slightly sweet. The roasted butternut squash gets caramelized and blended into the dreamiest sauce with garlic, shallots, and a splash of cream. It truly tastes like fall in a bowl. It’s easy enough for a weeknight but still feels special enough for date night. Once you make this butternut squash pasta, it’s going to be part of your regular rotation.
Ingredients and Substitutions
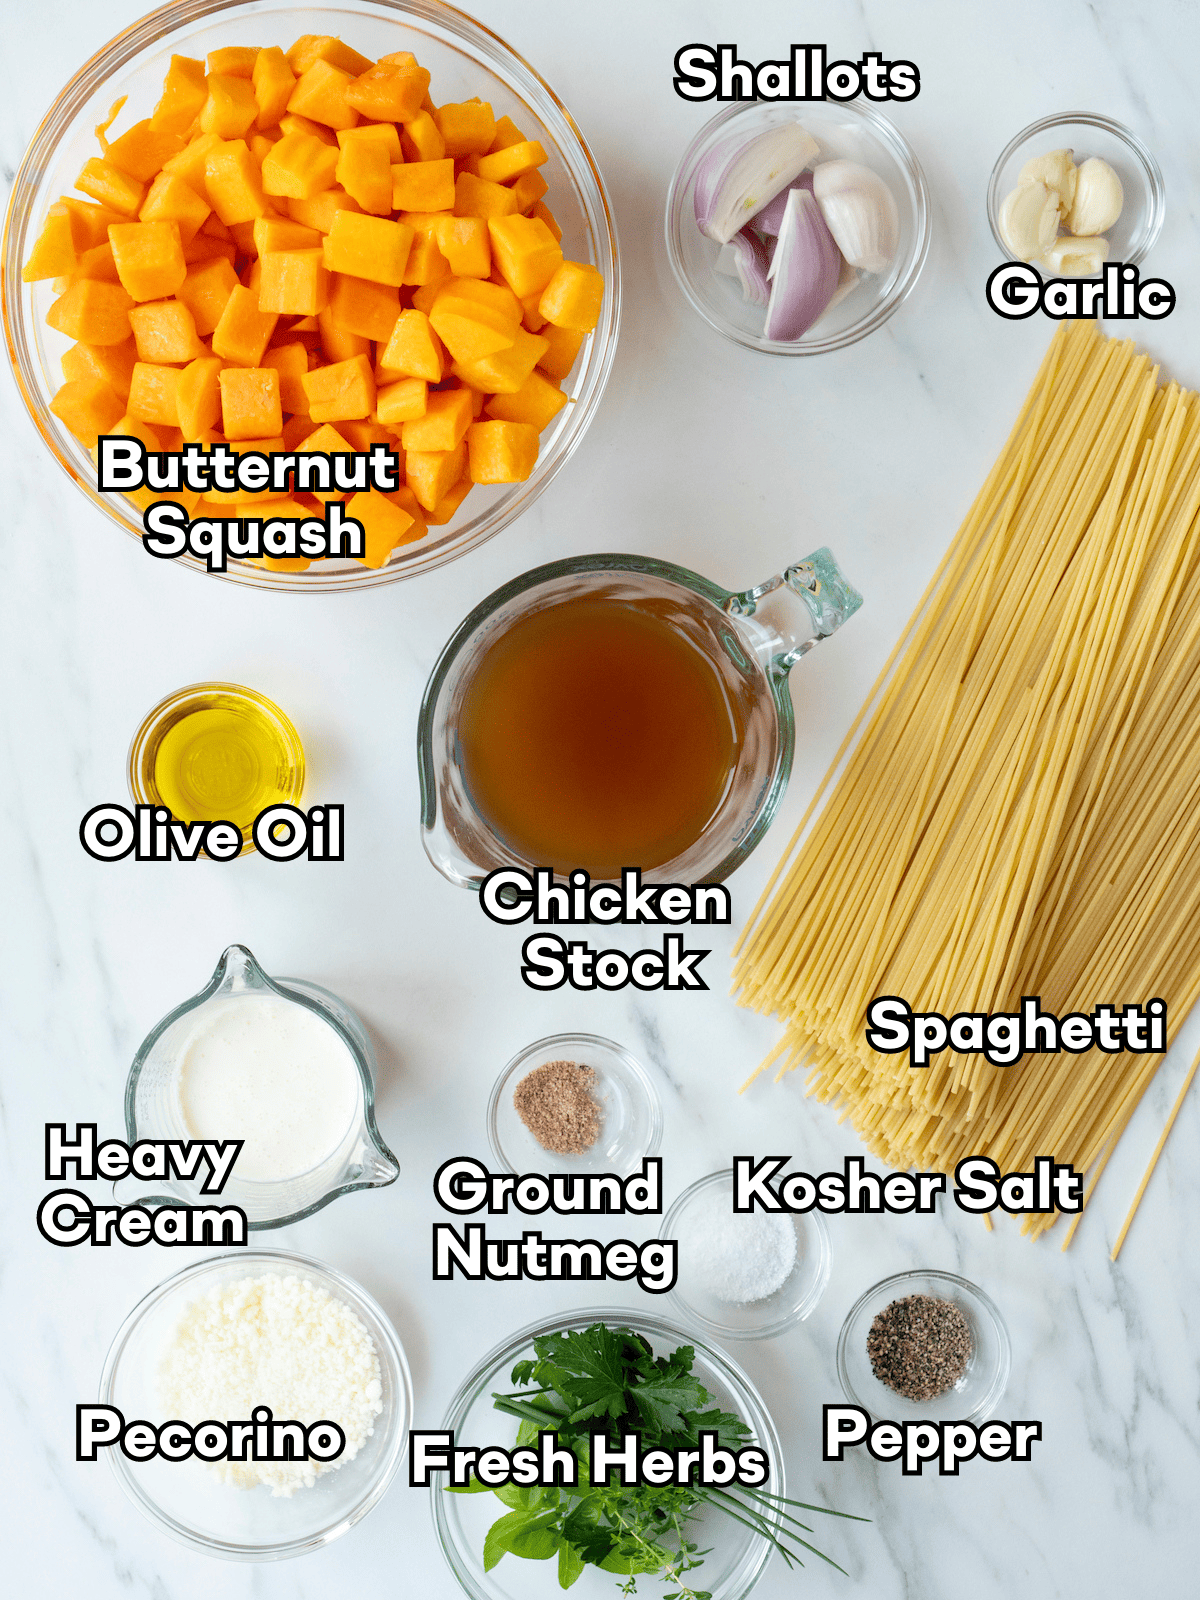
*For a full list of ingredients and instructions please see the recipe card at the end of the post
How to Make Creamy Butternut Squash Pasta
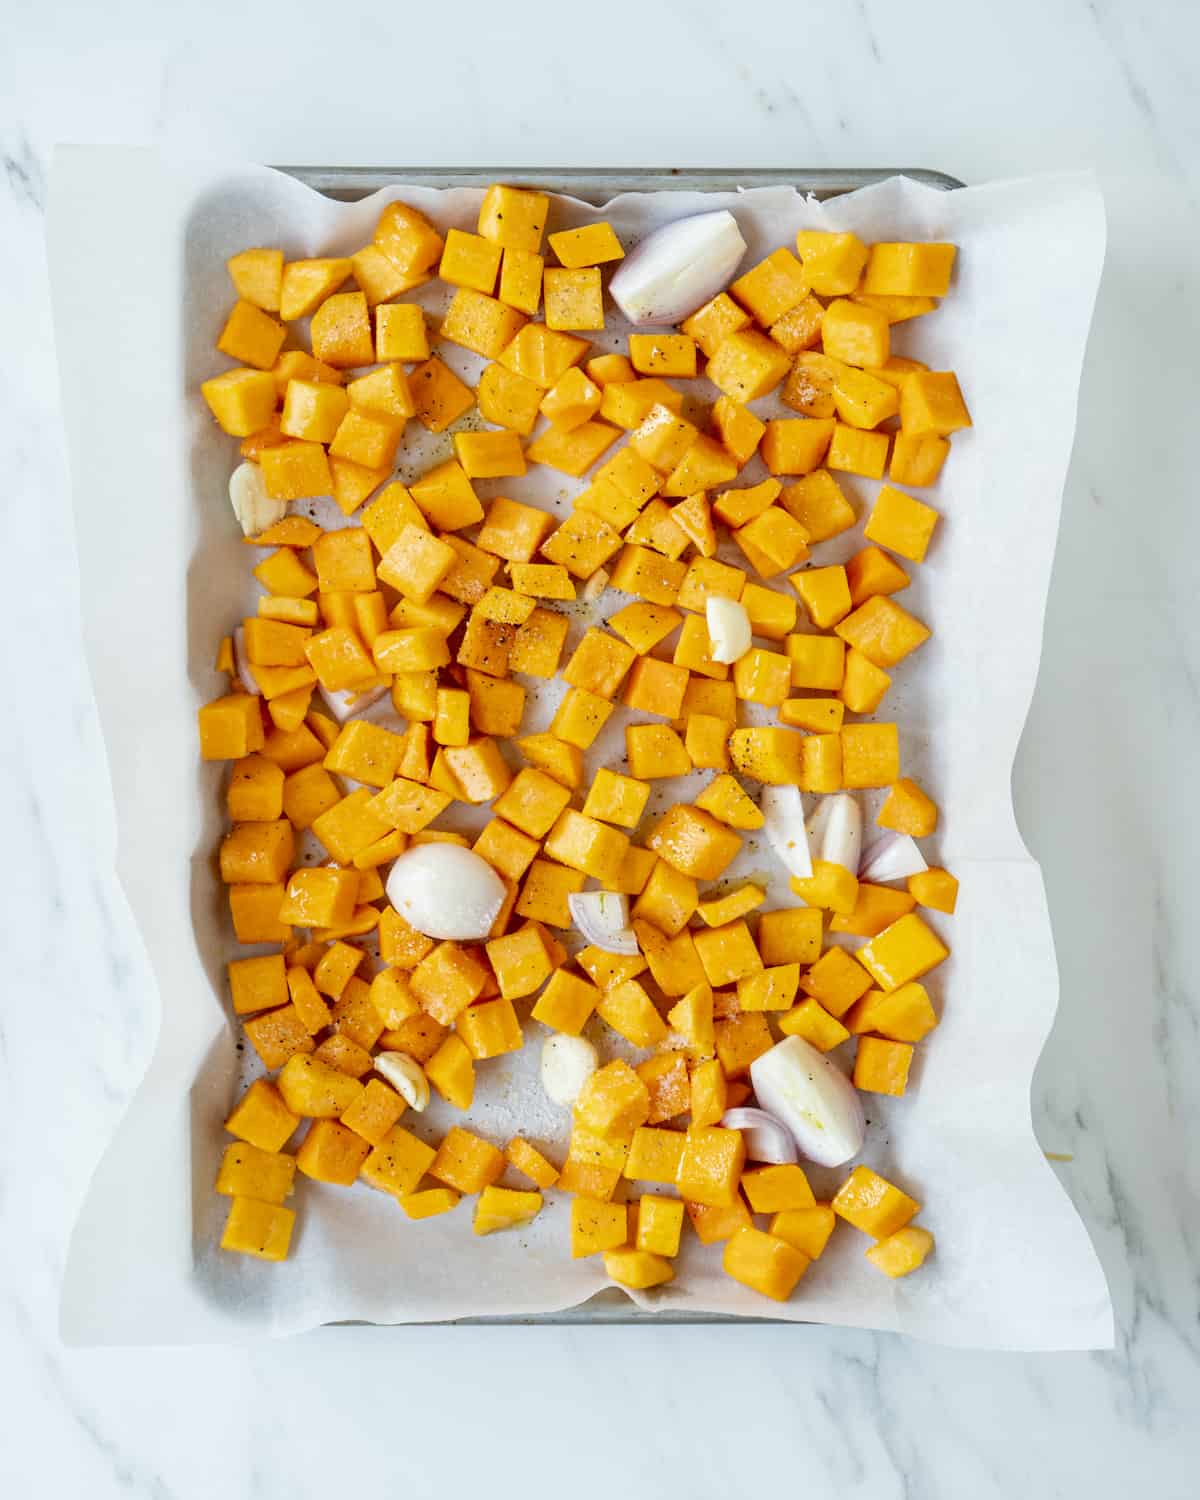
Step 1: On a large baking sheet lined with parchment paper, arrange the butternut squash, shallots, garlic and drizzle with olive oil and season with salt and pepper. Transfer into a 425-degree oven and roast for 25-30 minutes until the squash is fork tender.

Step 2: While the butternut squash is roasting, cook the pasta until al dente. Drain, reserving ½ cup of the cooking liquid.
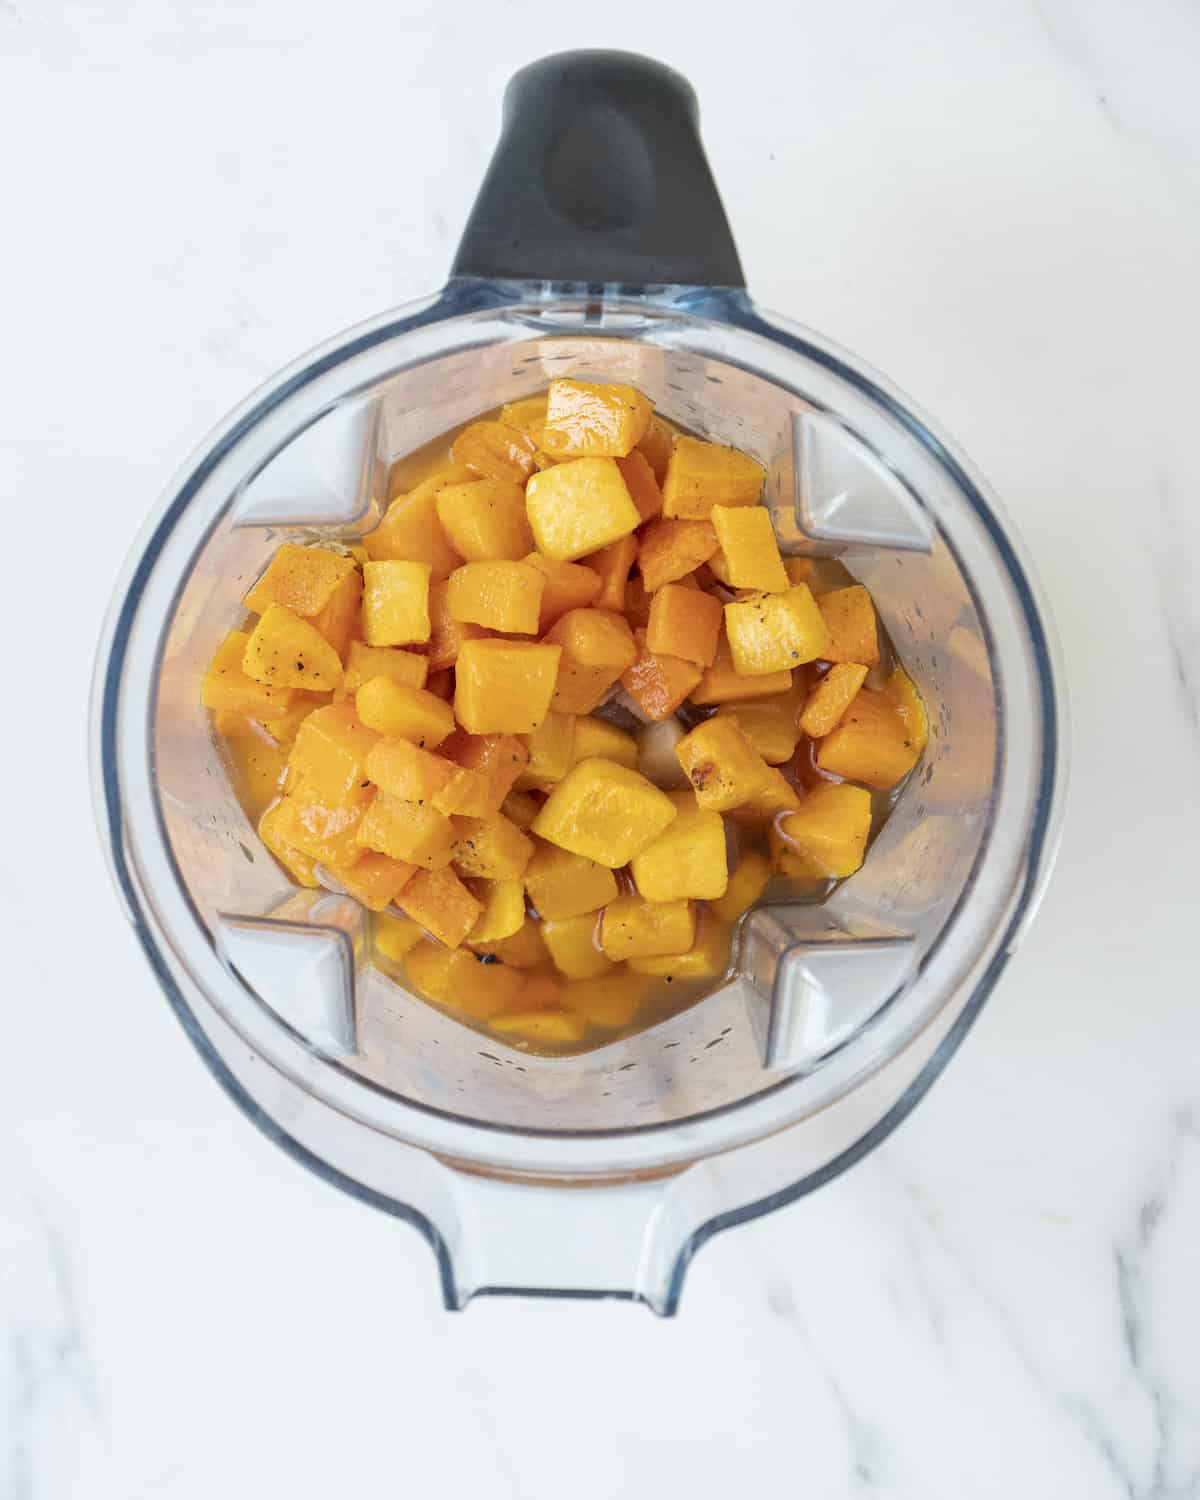
Step 3: Once the squash is tender, remove and transfer to a blender with the garlic and shallots with chicken stock. Blend until smooth.
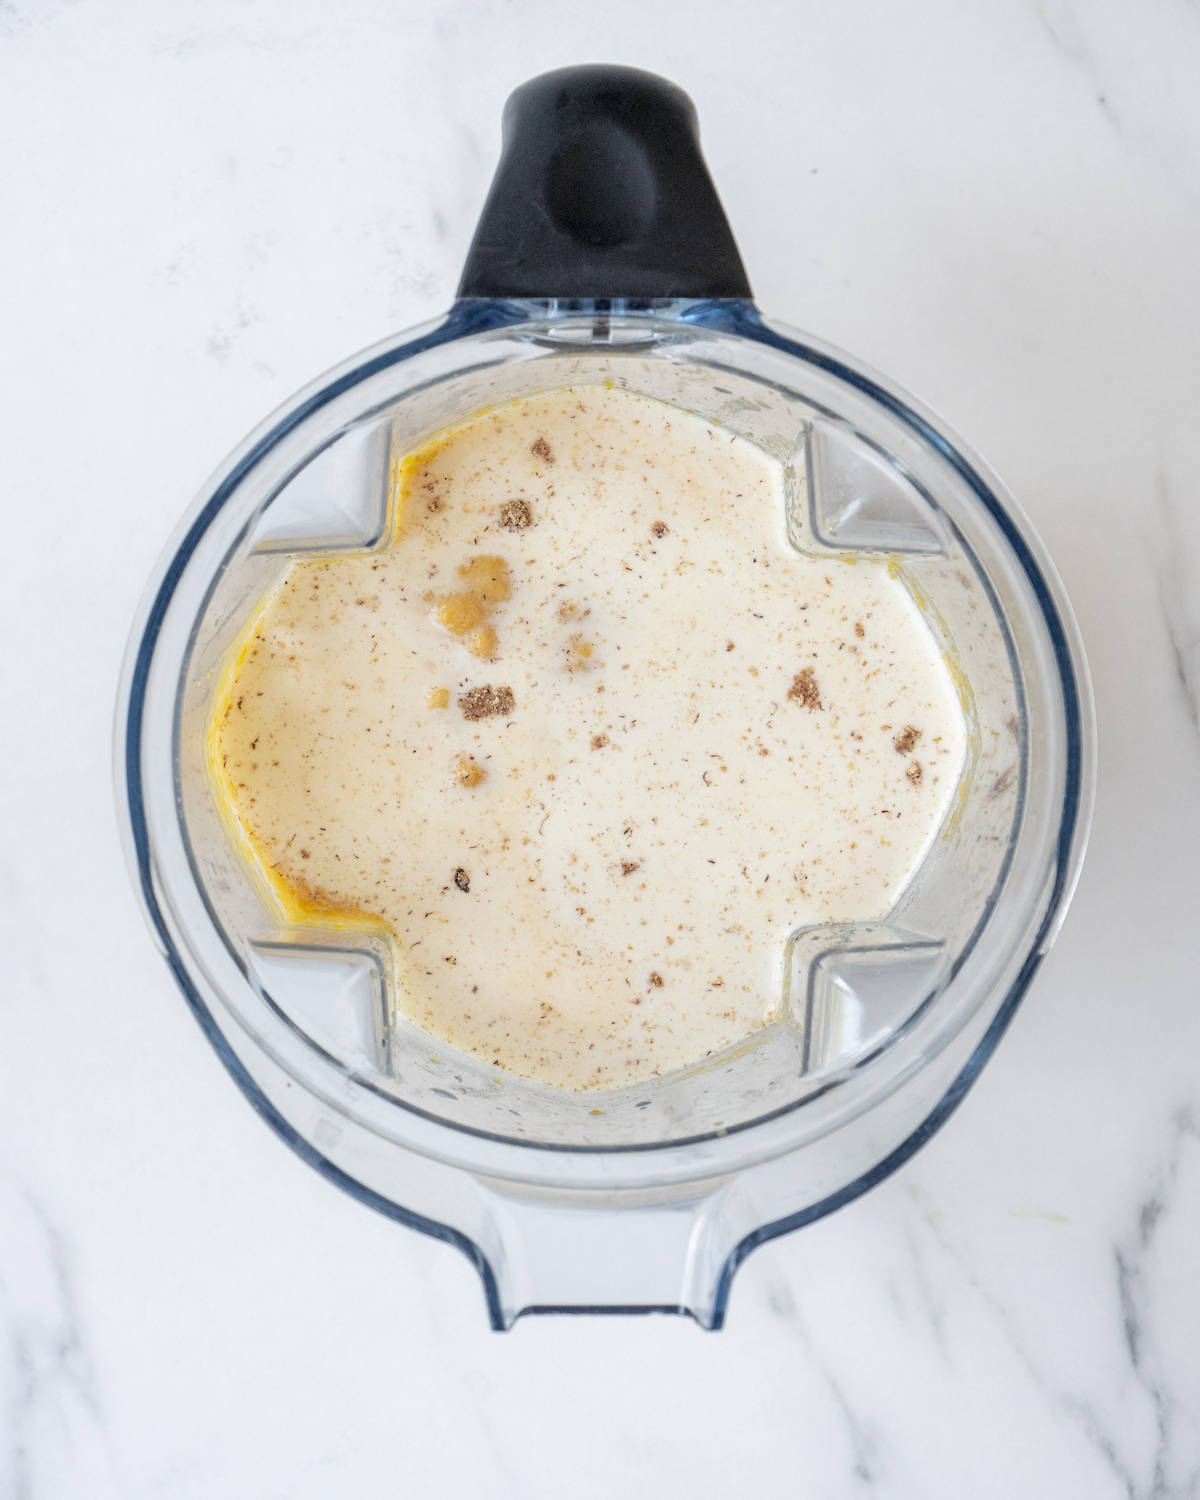
Step 4: Add the cream, nutmeg and reserved cooking liquid and continue to blend. Once smooth, taste and adjust seasoning as needed.
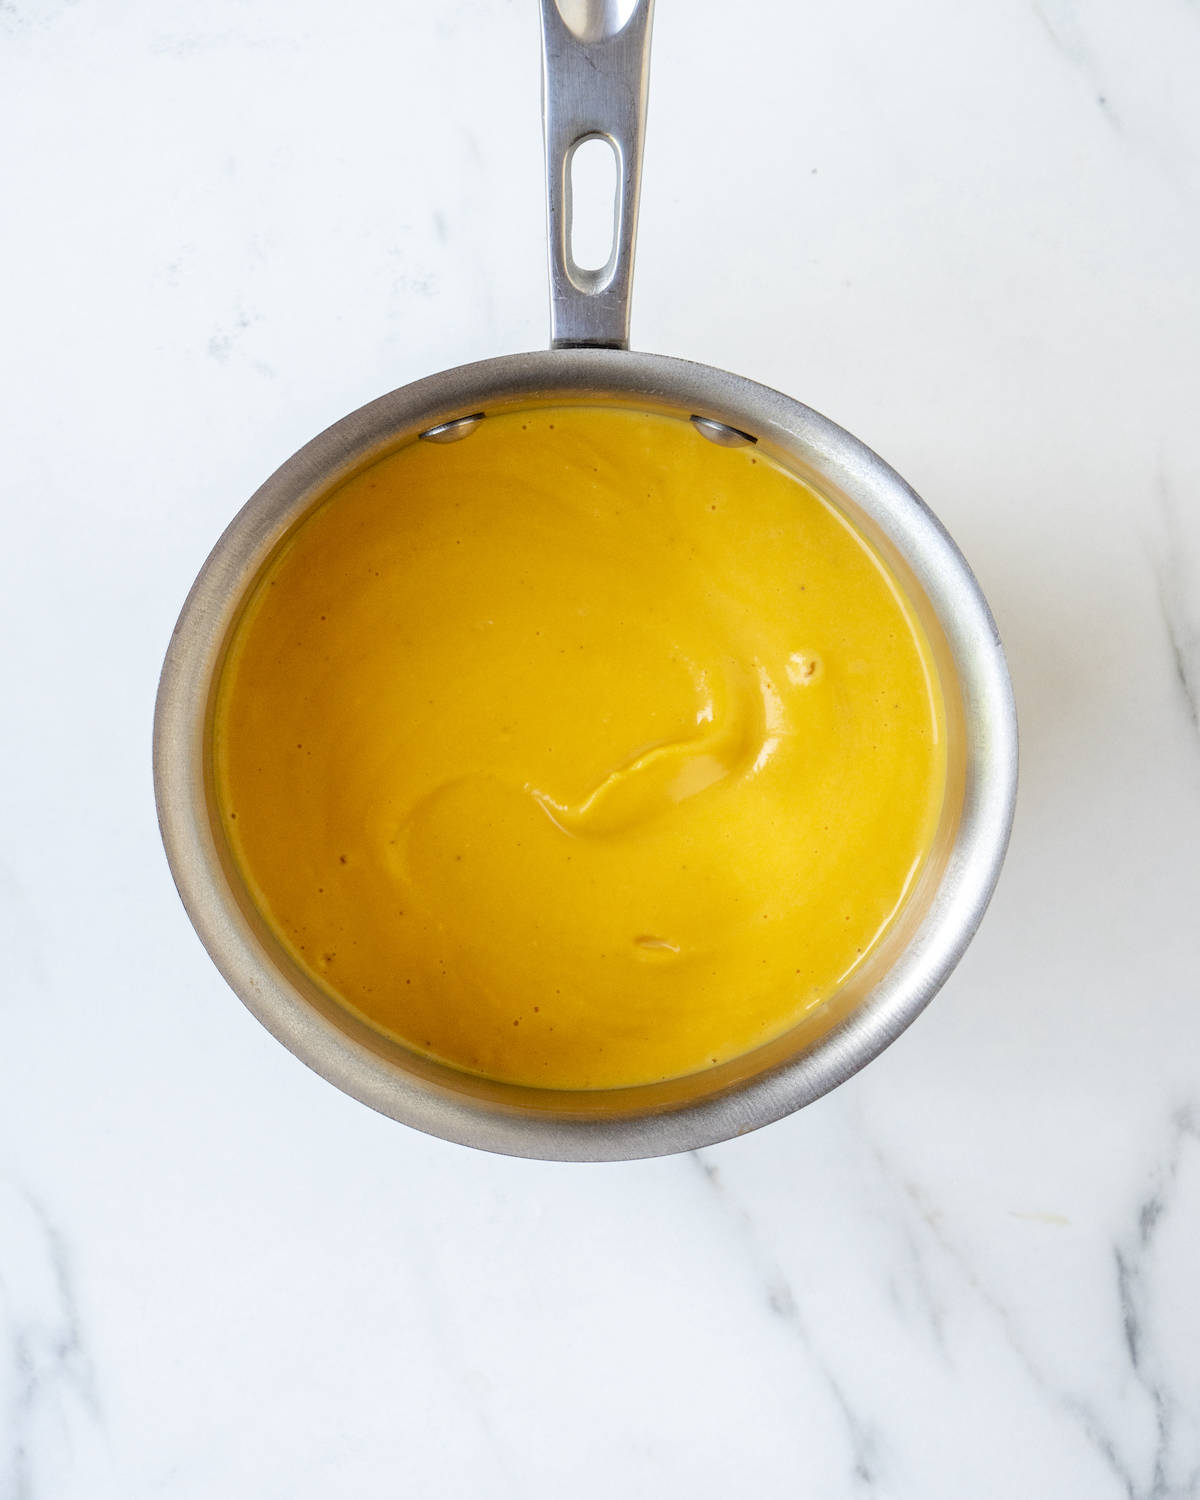
Step 5: Transfer the liquid to a medium pot and keep over low heat to keep warm.

Step 6: Add a few large spoonful’s of the sauce to the pasta and toss to combine. Continuing adding sauce until it’s as saucy as you want. Serve with pecorino, herbs and freshly cracked black pepper.
Tips and Tricks
- Roast the Squash for Extra Flavor: Don’t skip roasting. It deepens the sweetness and gives your sauce that rich, caramelized flavor you can’t get from steaming or boiling.
- Blend Until Silky Smooth: Use a high-speed blender or immersion blender to get a creamy, velvety texture. Add a little extra stock or pasta water if it feels too thick.
- Save That Pasta Water: A splash of starchy pasta water brings the sauce together and helps it cling perfectly to the noodles.
- Make It Ahead: The butternut squash sauce keeps beautifully in the fridge for up to 3 days. Reheat it gently on the stove and loosen with a bit of stock before tossing with pasta.
- Top It Off: Finish with plenty of Parmesan, a drizzle of olive oil, and some crispy sage leaves or toasted breadcrumbs for crunch.
FAQs
Can I use pre-cut or frozen butternut squash to make this pasta?
Absolutely. Pre-cut or frozen squash works perfectly here. If using frozen, just roast it straight from the freezer until caramelized and tender.
What kind of pasta works best with Butternut Squash Pasta?
I love this sauce with spaghetti, rigatoni, or fettuccine. Anything that holds onto the creamy butternut squash sauce works great.
Can I make Butternut Squash Pasta dairy-free?
Yes. Swap the heavy cream for coconut cream or a splash of unsweetened oat milk. It will still be creamy and delicious.
How long does Butternut squash sauce last?
The sauce keeps in an airtight container in the fridge for up to 3 days, or in the freezer for up to 3 months. Reheat gently on the stove and thin with a little broth or pasta water.
Can I add protein to this Butternut Squash Pasta?
Definitely. Crispy pancetta, grilled chicken, or sautéed shrimp all pair beautifully with the butternut squash pasta sauce.

Stuck in a dinner rut? Looking for new delicious dinner ideas? Check out my roundup of 50+ easy dinner ideas here.
If you tried this recipe, please leave a 🌟 star rating and let me know how it goes in the 📝 comments below. Thanks for visiting today!
Creamy Butternut Squash Pasta
Ingredients
- 1 medium butternut squash peeled and cut into 2-inch cubes (about 4 cups once cubed)
- 2 shallots halved
- 4 cloves garlic peeled
- 2 tablespoons olive oil
- 1.5 cups chicken stock
- 1 lb spaghetti
- ½ cup heavy cream
- Pinch of ground nutmeg or a pinch of Tuscan Dalkin&Co seasoning
- Kosher salt and freshly cracked black pepper
Serve with:
- Grated pecorino or parmesan
- Fresh herbs like thyme
- lemon juice optional
Instructions
- On a large baking sheet lined with parchment paper, arrange the butternut squash, shallots, garlic and drizzle with olive oil and season with salt and pepper. Transfer into a 425-degree oven and roast for 25-30 minutes until the squash is fork tender.
- While the butternut squash is roasting, cook the pasta until al dente. Drain, reserving ½ cup of the cooking liquid.
- Once the squash is tender, remove and transfer to a blender with the garlic and shallots with chicken stock. Blend until smooth. Add the cream, seasonings and reserved cooking liquid and continue to blender. Once smooth, taste and adjust seasoning as needed. Transfer the liquid to a medium pot and keep over low heat to keep warm.
- Add a few large spoonful’s of the sauce to the pasta and toss to combine. Continuing adding sauce until it’s as saucy as you want. Serve with pecorino, herbs and freshly cracked black pepper. If you want it a bit brighter, stir in a squeeze of lemon juice.
Notes
-
- Roast the Squash for Extra Flavor: Don’t skip roasting. It deepens the sweetness and gives your sauce that rich, caramelized flavor you can’t get from steaming or boiling.
- Blend Until Silky Smooth: Use a high-speed blender or immersion blender to get a creamy, velvety texture. Add a little extra stock or pasta water if it feels too thick.
- Save That Pasta Water: A splash of starchy pasta water brings the sauce together and helps it cling perfectly to the noodles.
- Make It Ahead: The butternut squash sauce keeps beautifully in the fridge for up to 3 days. Reheat it gently on the stove and loosen with a bit of stock before tossing with pasta.
- Top It Off: Finish with plenty of Parmesan, a drizzle of olive oil, and some crispy sage leaves or toasted breadcrumbs for crunch.
Nutrition Information (estimated)
Photo by Matt Armendariz / Food Styling by Adam Pearson / Recipe from What’s Gaby Cooking


Thank you so much for responding to the comments and questions. I was just about to ask about the conversion if I used frozen or puree that I already have prepared, but you've already answered the question in response to others' questions. Your care and engagement with those of us who try your recipes is half the reason I keep coming back. You should know how much that is appreciated. Thank you!
Amanda
PS: the other half is your weekly discussion of Game of Thrones...haha!
Could you suggest another use for this sauce?
Thnx for reply!
you could use it on any type of protein or toss it into a grain salad
I am absolutely making this TONIGHT!! I love all things squash.
This looks delish! Do you serve it with a protein at all? I'm thinking chicken or shrimp?
either or!
I've tried this recipe before and it was a hit! Even my husband that does not like squash of any kind eat it and liked it. I added a pinch of cayenne pepper. Also I tried it another time with crumbled bacon. I love fall recipes.
This was very delicious! I topped off the serving with grated parmesan, crushed pecans, and fresh basil. I would definitely recommend adding crushed pecans to get a nice flavor and added texture variety to the dish.
I can't wait to make this super delicious meal!
I made this last night for dinner, exactly as indicated. I wondered if it would be a bit bland but was pleasantly surprised to find it uniquely flavorful. Family at their fill, and there is entire other meal leftover. That works for me!
Wow! I just made this and it was amazing. My whole family loved it. Next time I make it, I'm going to add grilled chicken and sautéed mushrooms. Thanks Gaby for the awesome recipe!
Do you know if this sauce re-heats well the next day?
it absolutely does!
I just made this for Valentine's dinner last night with some spicy shrimp and it was pretty tasty! It was easy to make and made us feel tres fancy (we're typical jarred sauce bums). I have to be honest I think the pasta would have been a little bland had we not served it with the shrimp, but I think that could be easily remedied by adding some more spices.
Yum! Would scallops be good with this?
TOTALLY!
Do you peel the squash?
yes!
I have 12 oz packages of frozen puréed winter squash that my son use to eat as a baby that I'm not sure what to do with. Am I able to use puréed winter squash in this recipe? If so, how many ounces or cups would you recommend? Also, do you have any other recipes for puréed winter squash? Thanks Gaby!
you could totally use pureed winter squash. I'd start with about 1 1/2 cups for this recipe and add more as needed
Can anything be used for a healthy replacement of the heavy cream?
coconut milk is great