
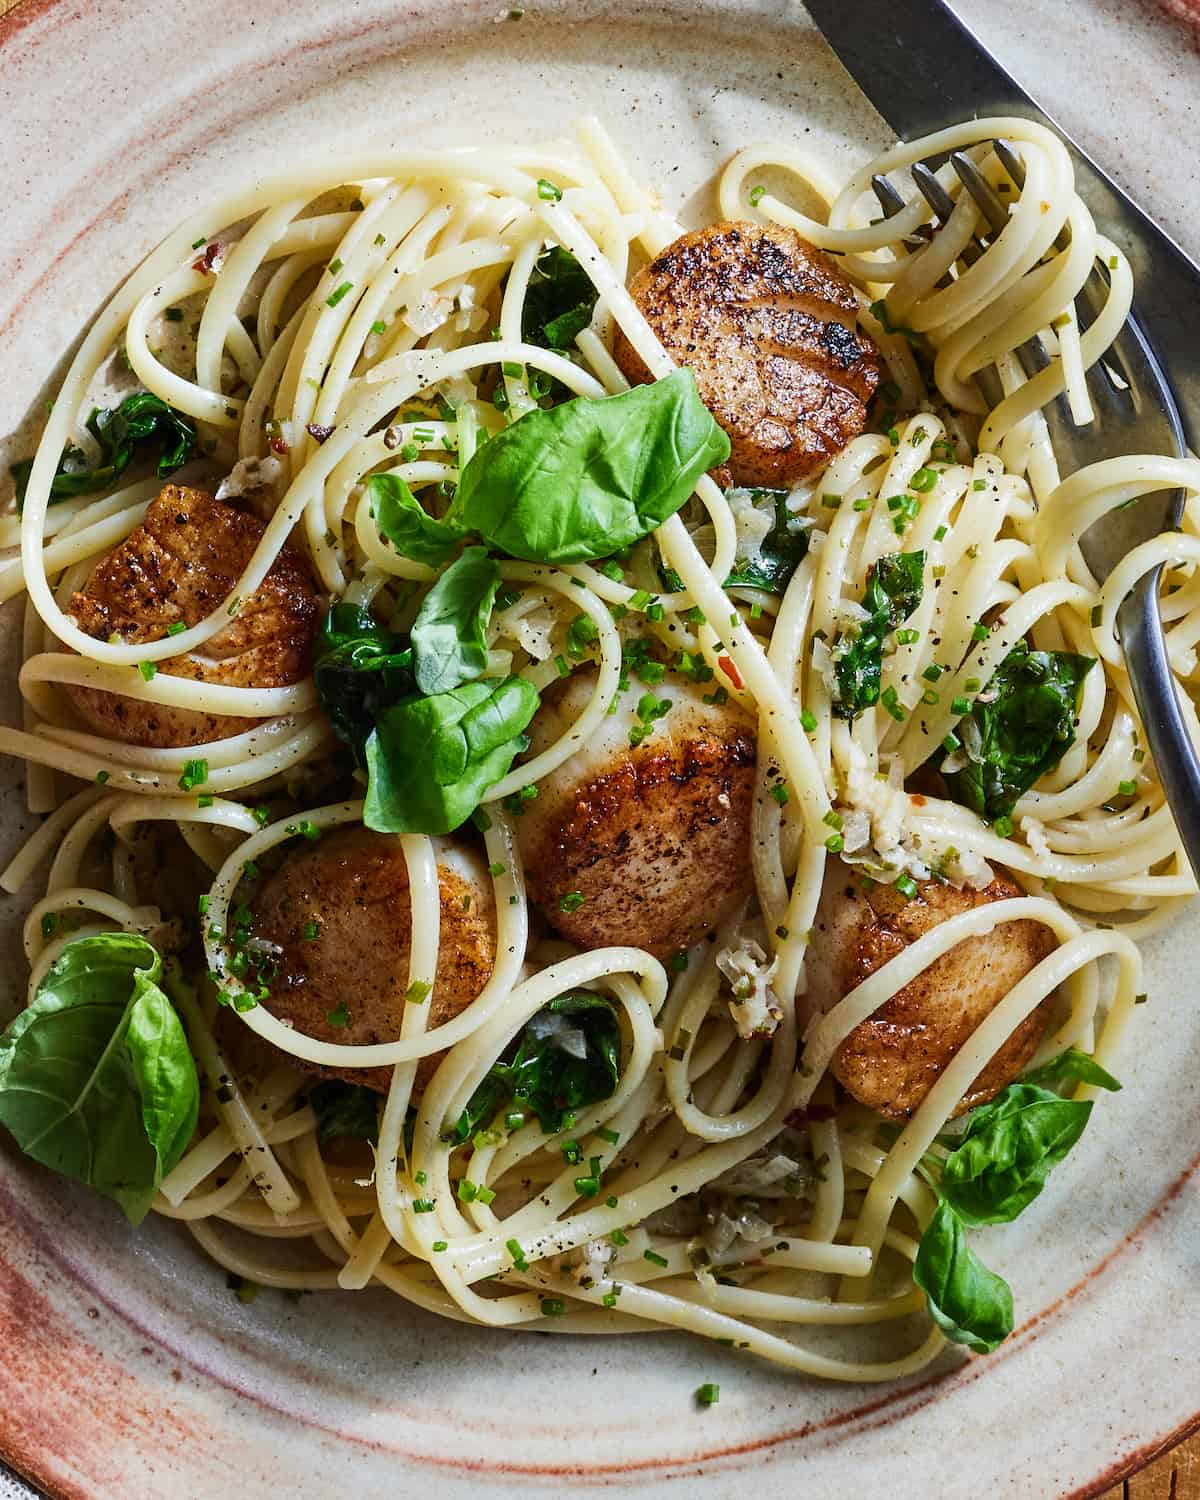
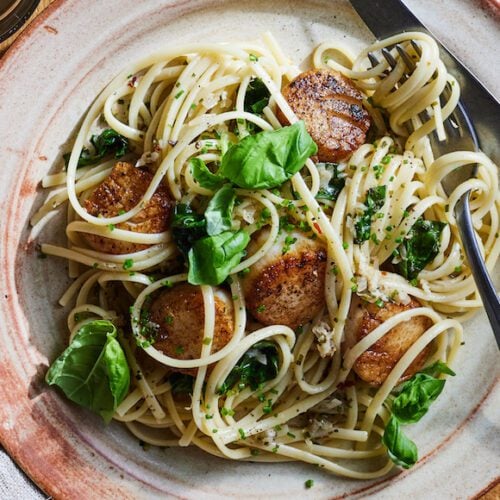
A Lemon Garlic Scallop Pasta is the perfect restaurant-style meal that you can make at home! Picture it now. A nice crisp minerally white wine, this lemon garlic scallop pasta, maybe a side of this most delicious butter lettuce salad and some warm garlic bread. Sounds like a dream dinner.
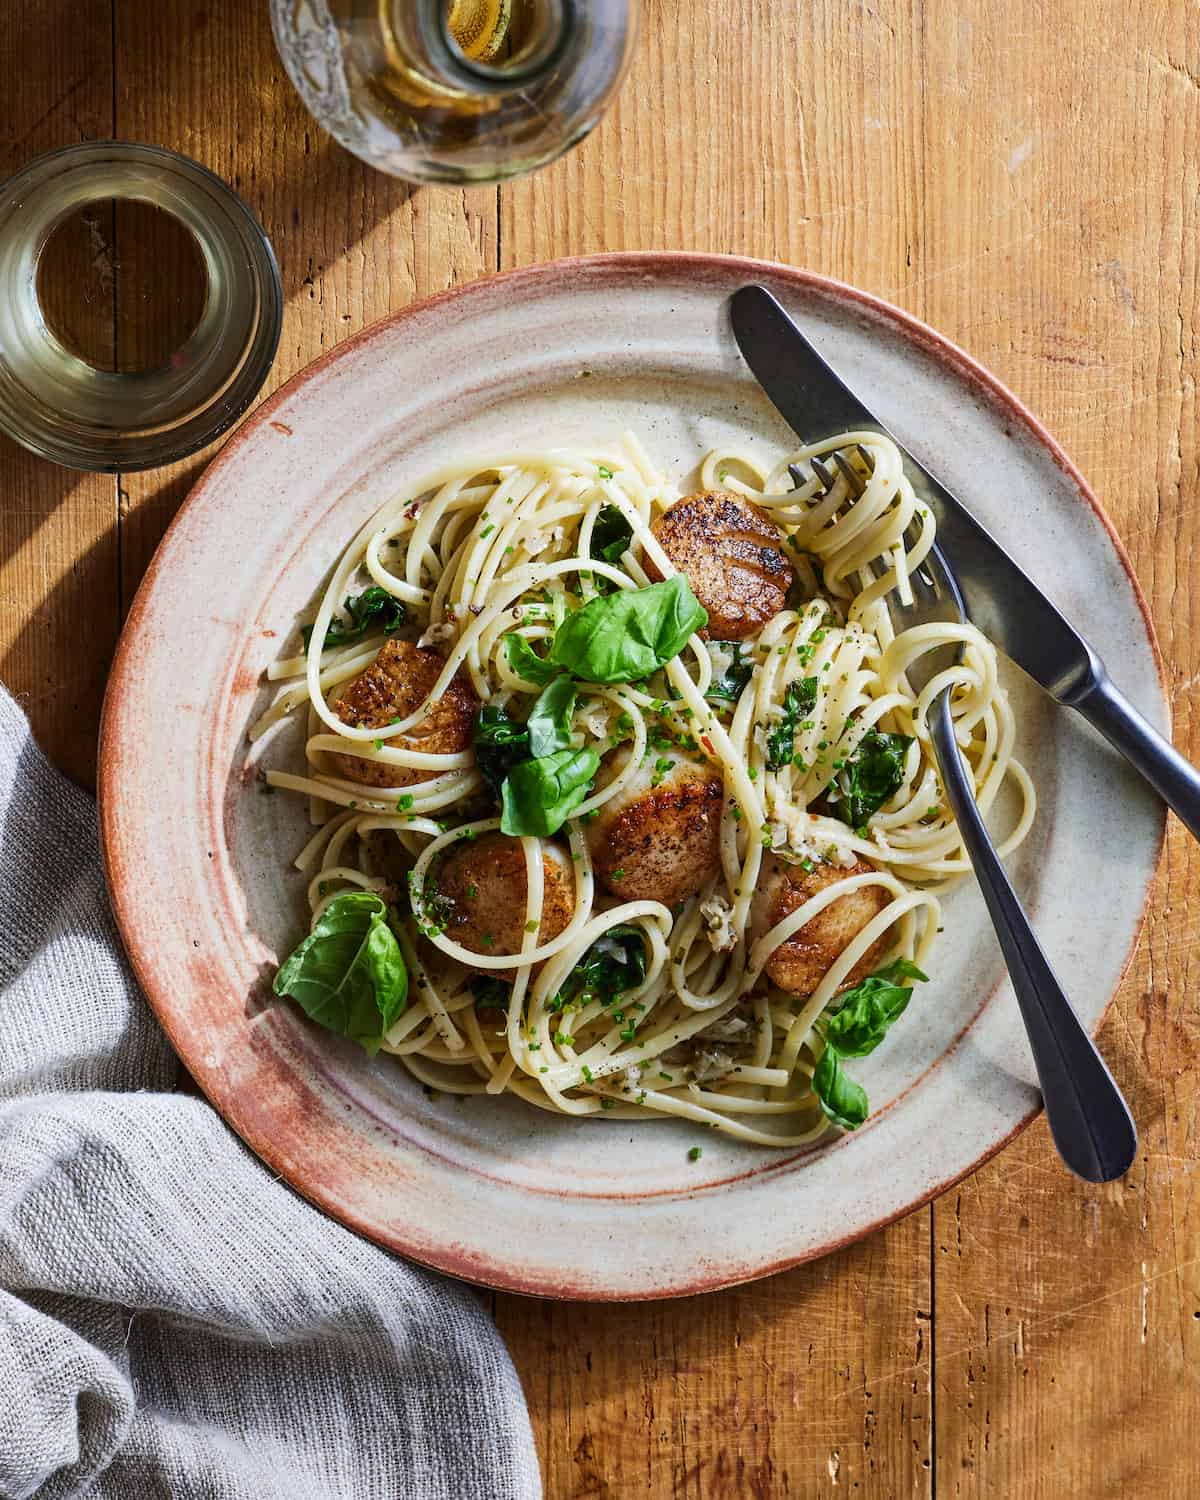
Table of Contents
I think it's safe to say we're a bunch of pasta lovers here at WGC. And based on some of everyone's favorite recipes like Creamy Lemon Cacio e Pepe or Garlic Buttered Angel Hair with Burrata it's also safe to say we love garlic, lemon, herbs and things that are fresh and light and loaded with flavor. So this Lemon Garlic Scallop Pasta is right up our alley!
If you've never made scallops before - DON'T FEAR! I'm about to walk you through it. And if you've never had scallops before - omg let me be the first to welcome you to your new favorite seafood dish. Scallops are actually quite easy to make.
Ingredients & Substitutions
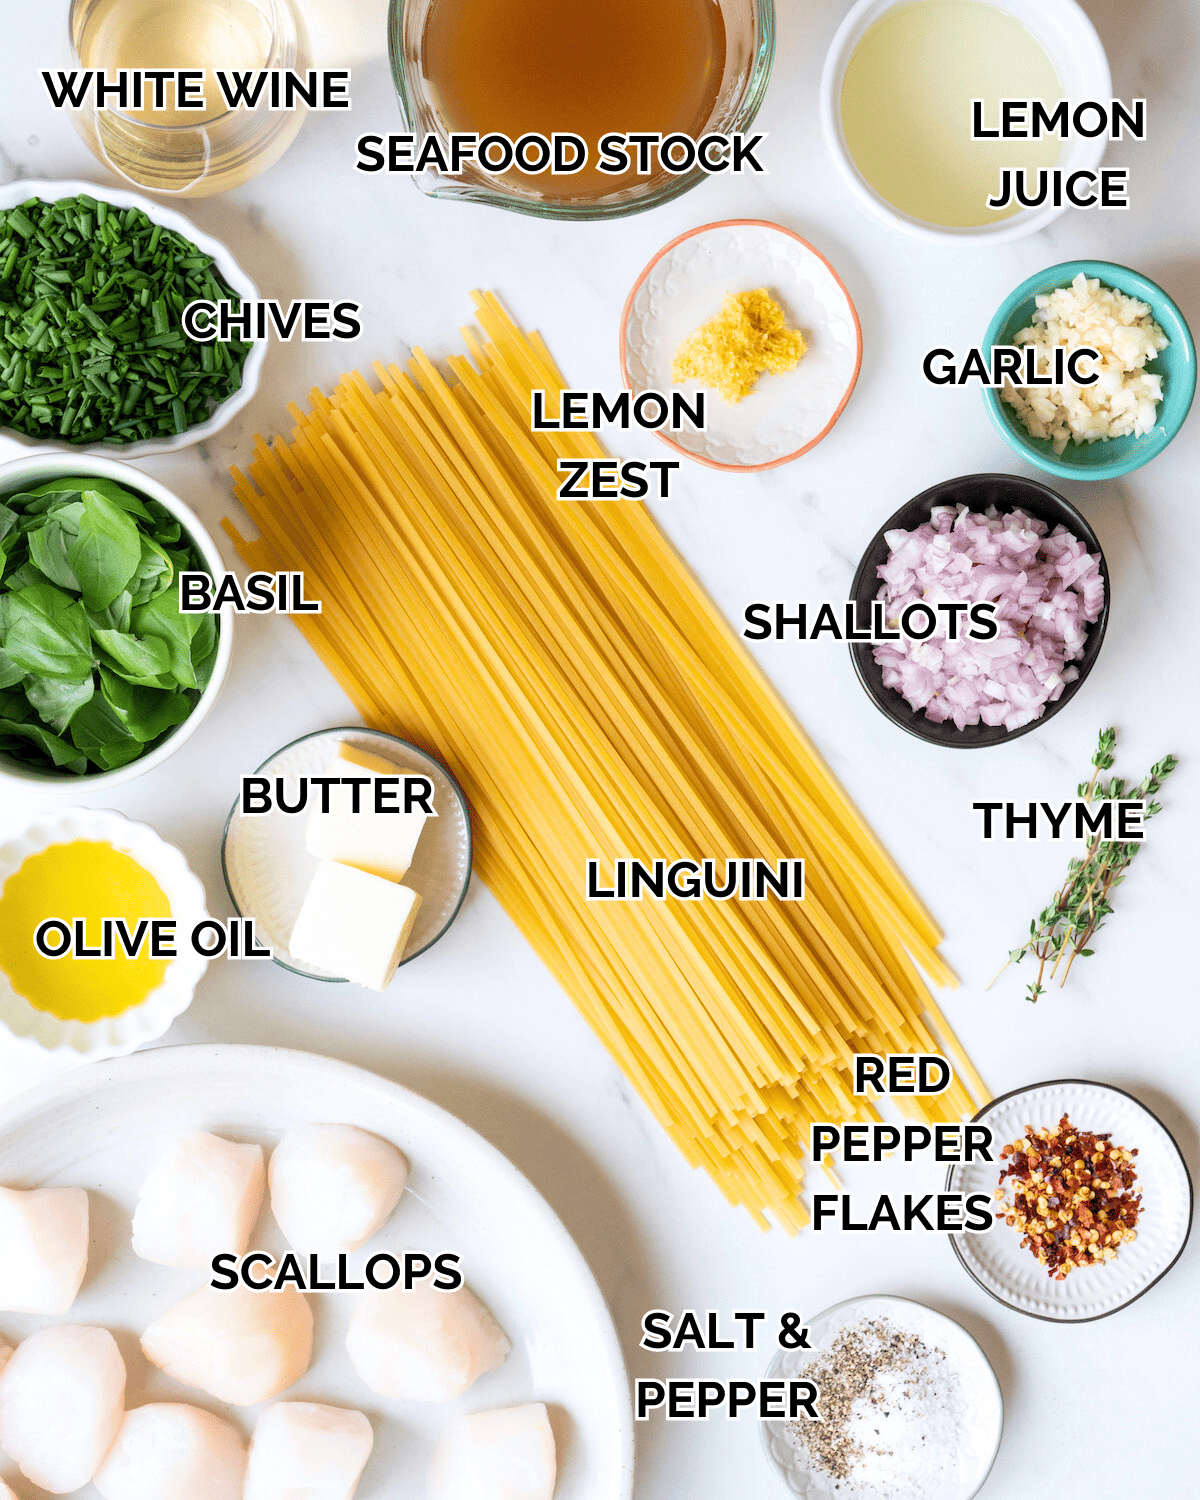
- Scallops - Substitute the scallops in this Scallop Pasta recipe for shrimp or even a white fish like halibut. If using frozen scallops be sure to thaw them out entirely before cooking.
- Linguini
- Salt & Pepper
- Olive Oil
- Butter
- Garlic
- Shallot
- Red Pepper Flakes
- Fresh Thyme
- White Wine – This Scallop Pasta recipe can be made without the white wine, skip it and use twice the amount of stock.
- Seafood Stock
- Fresh Basil
- Chopped Chives
- Lemon
*For the full list of ingredients and instructions see recipe card below
How to Make Scallop Pasta
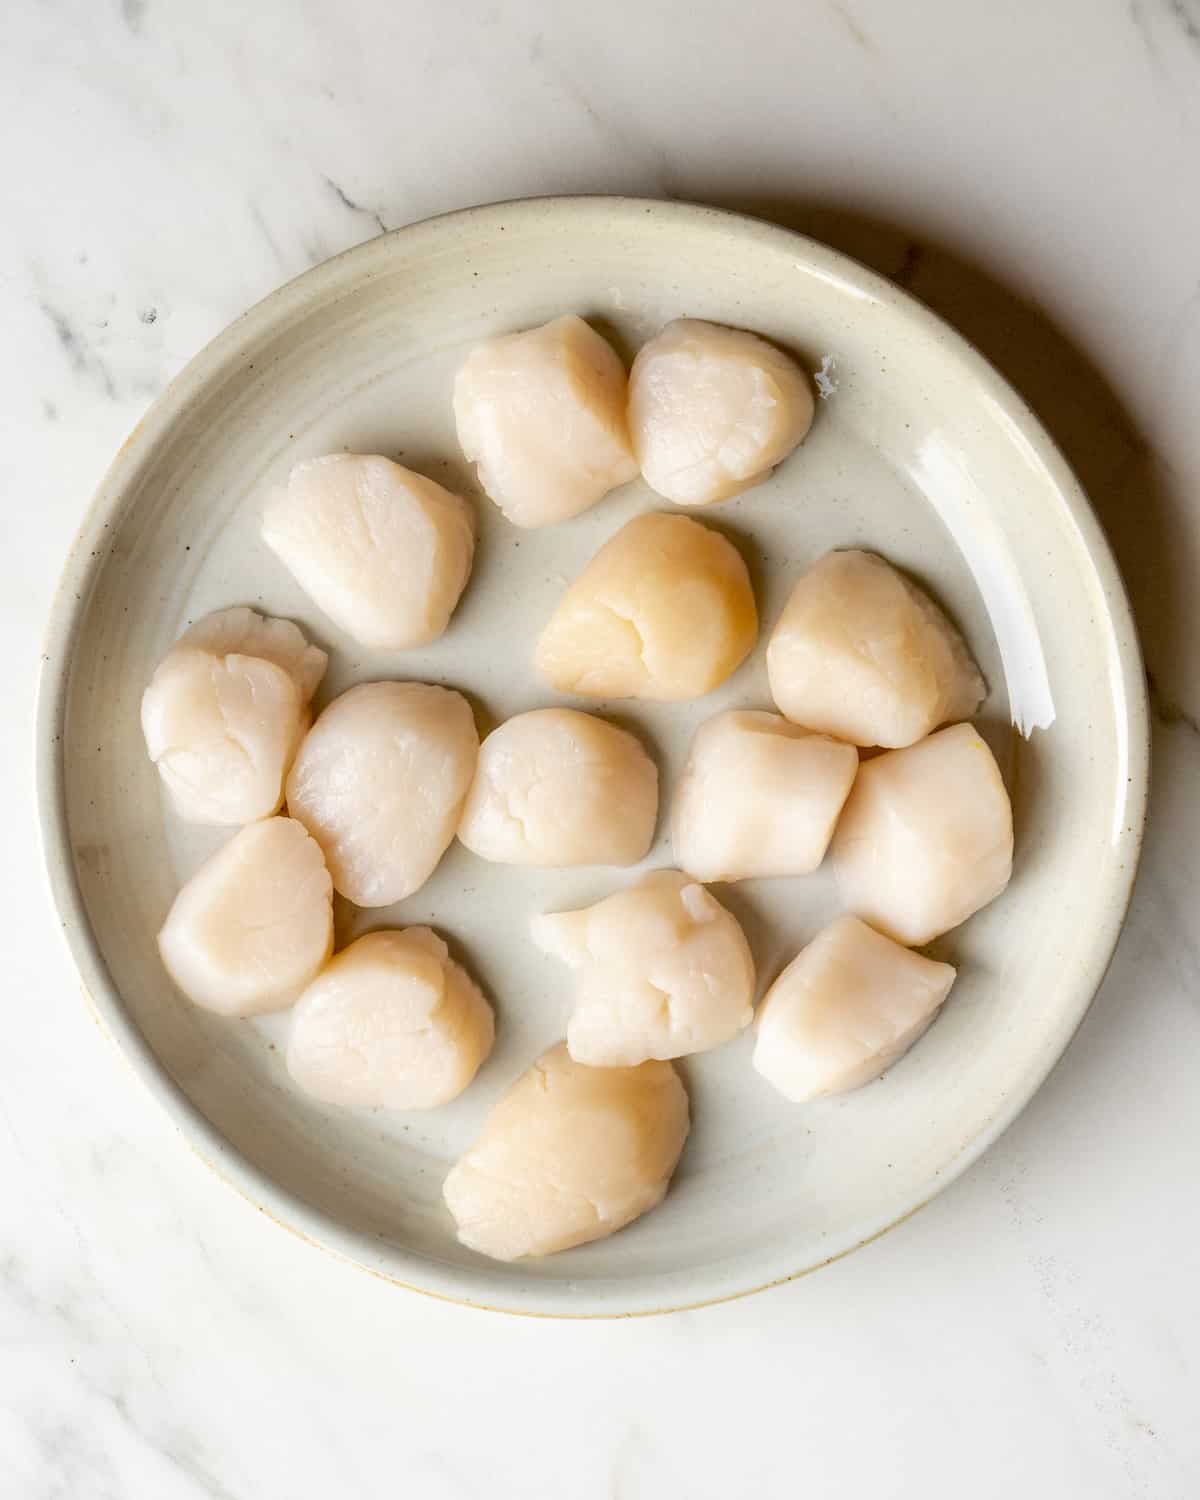
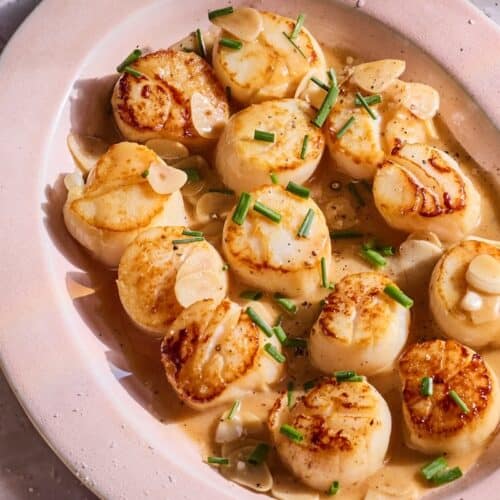
Step 1: For this Scallop Pasta recipe start by cooking the linguini. Hold off on starting the scallops until you drop your pasta into a pot of boiling water. Once the pasta is rolling, remove the muscle from the scallops and pat dry with a paper towel pat. Season the scallops heavily with salt and pepper.
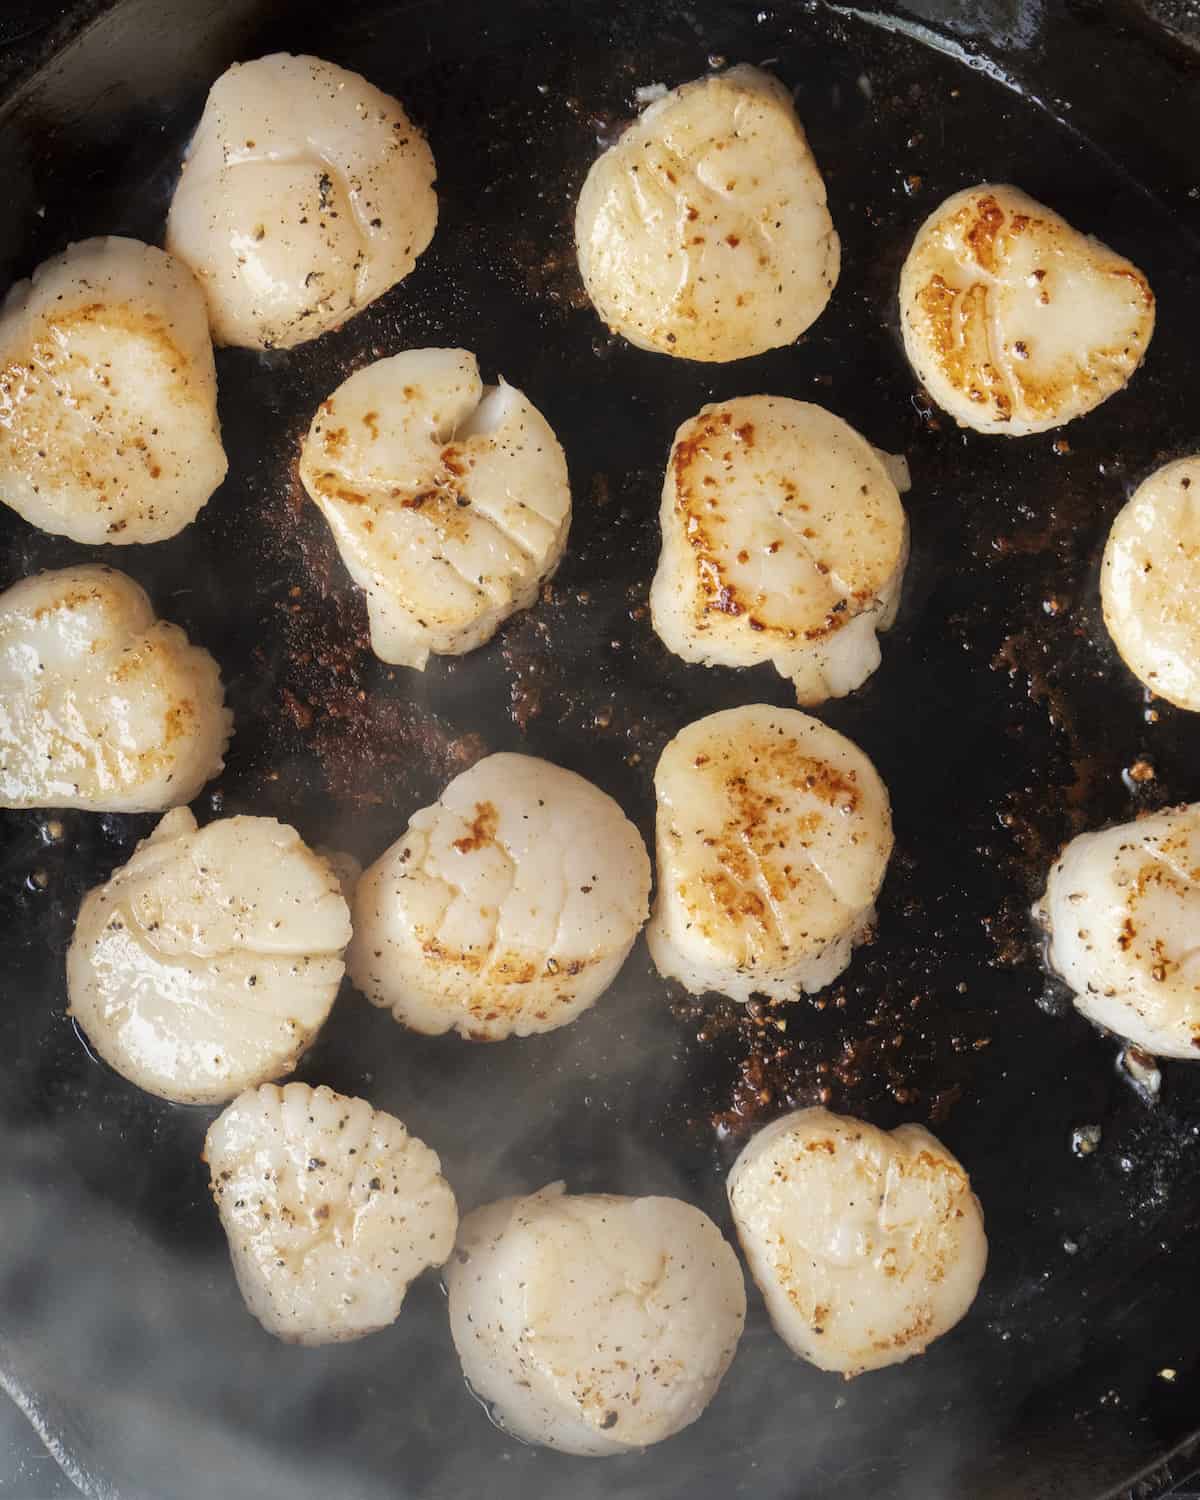
Step 2: Preheat a large cast iron skillet over medium high heat. You want the pan to be hot before you place your scallops into the pan. Add a thin coating of olive oil so really get that good sear and lock in the flavor. Too much oil will splatter, but you want the pan to be coated so nothing sticks. Once the oil is shimmering, add the scallops. Sear the scallops for 2-3 minutes on each side until super golden brown. Don't futz with them they should only be flipped once.

Step 3: A minute before they're done, add 2 tablespoons of butter and baste the scallops, then remove from pan and tent loosely with foil to keep warm
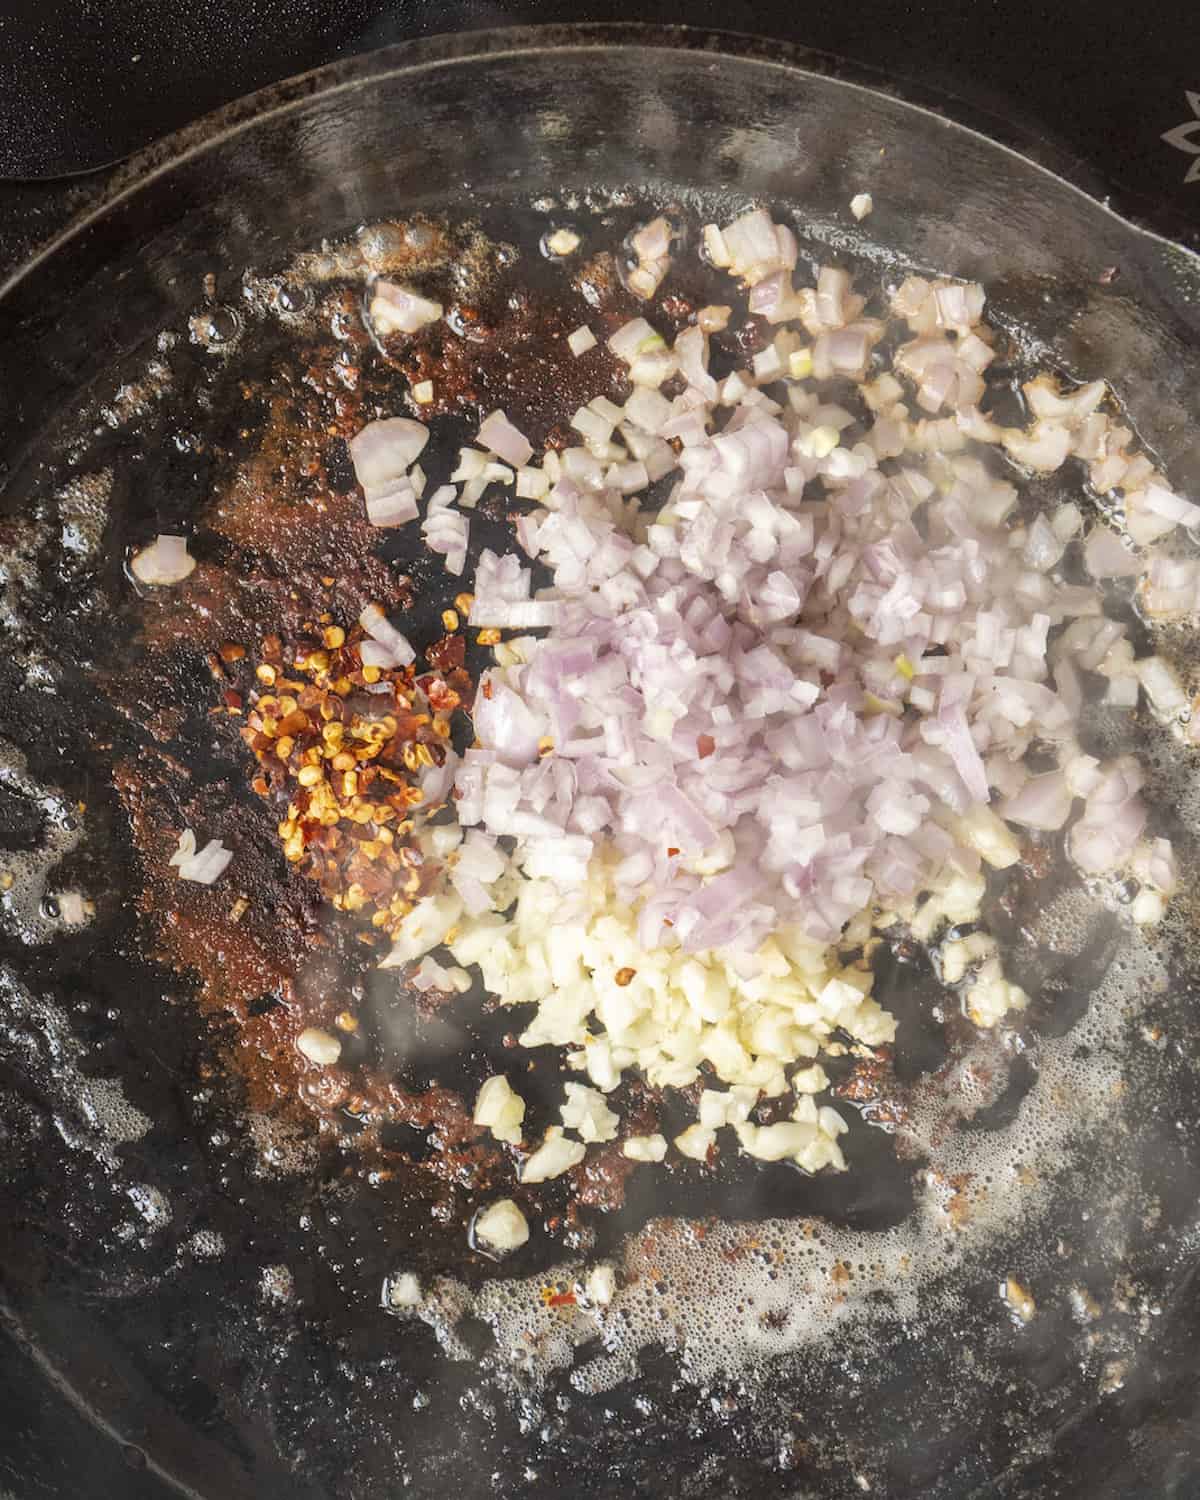
Step 4: Add an additional drizzle of olive oil to the skillet and add the garlic, shallots, crushed red pepper flakes, thyme, salt and pepper. Reduce heat to medium low and sauté garlic and shallots 1 to 2 minutes, stirring constantly.
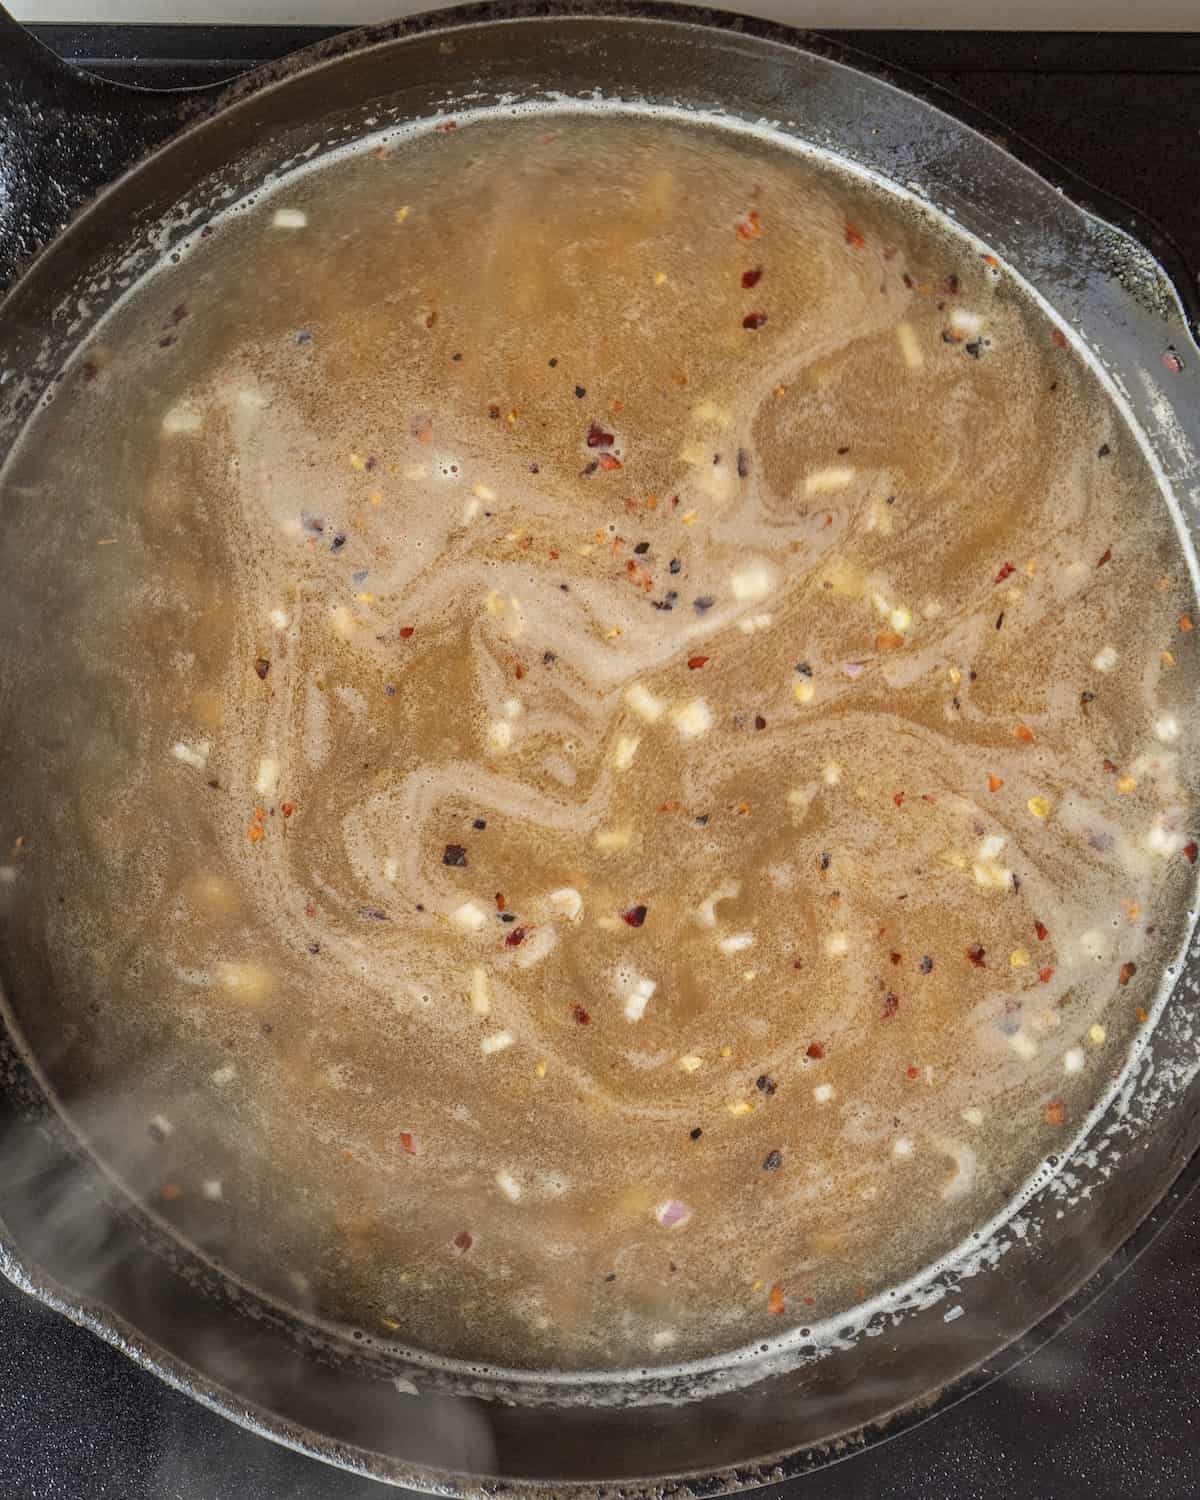
Step 5: Add wine to the pan and scrape up any pan drippings. Reduce the wine for 1 minute, then add seafood stock. Continue to cook for about 1 minute. Add the basil, chives, lemon zest and juice and the remaining 1 tablespoon of butter and stir the mixture until the butter has melted.
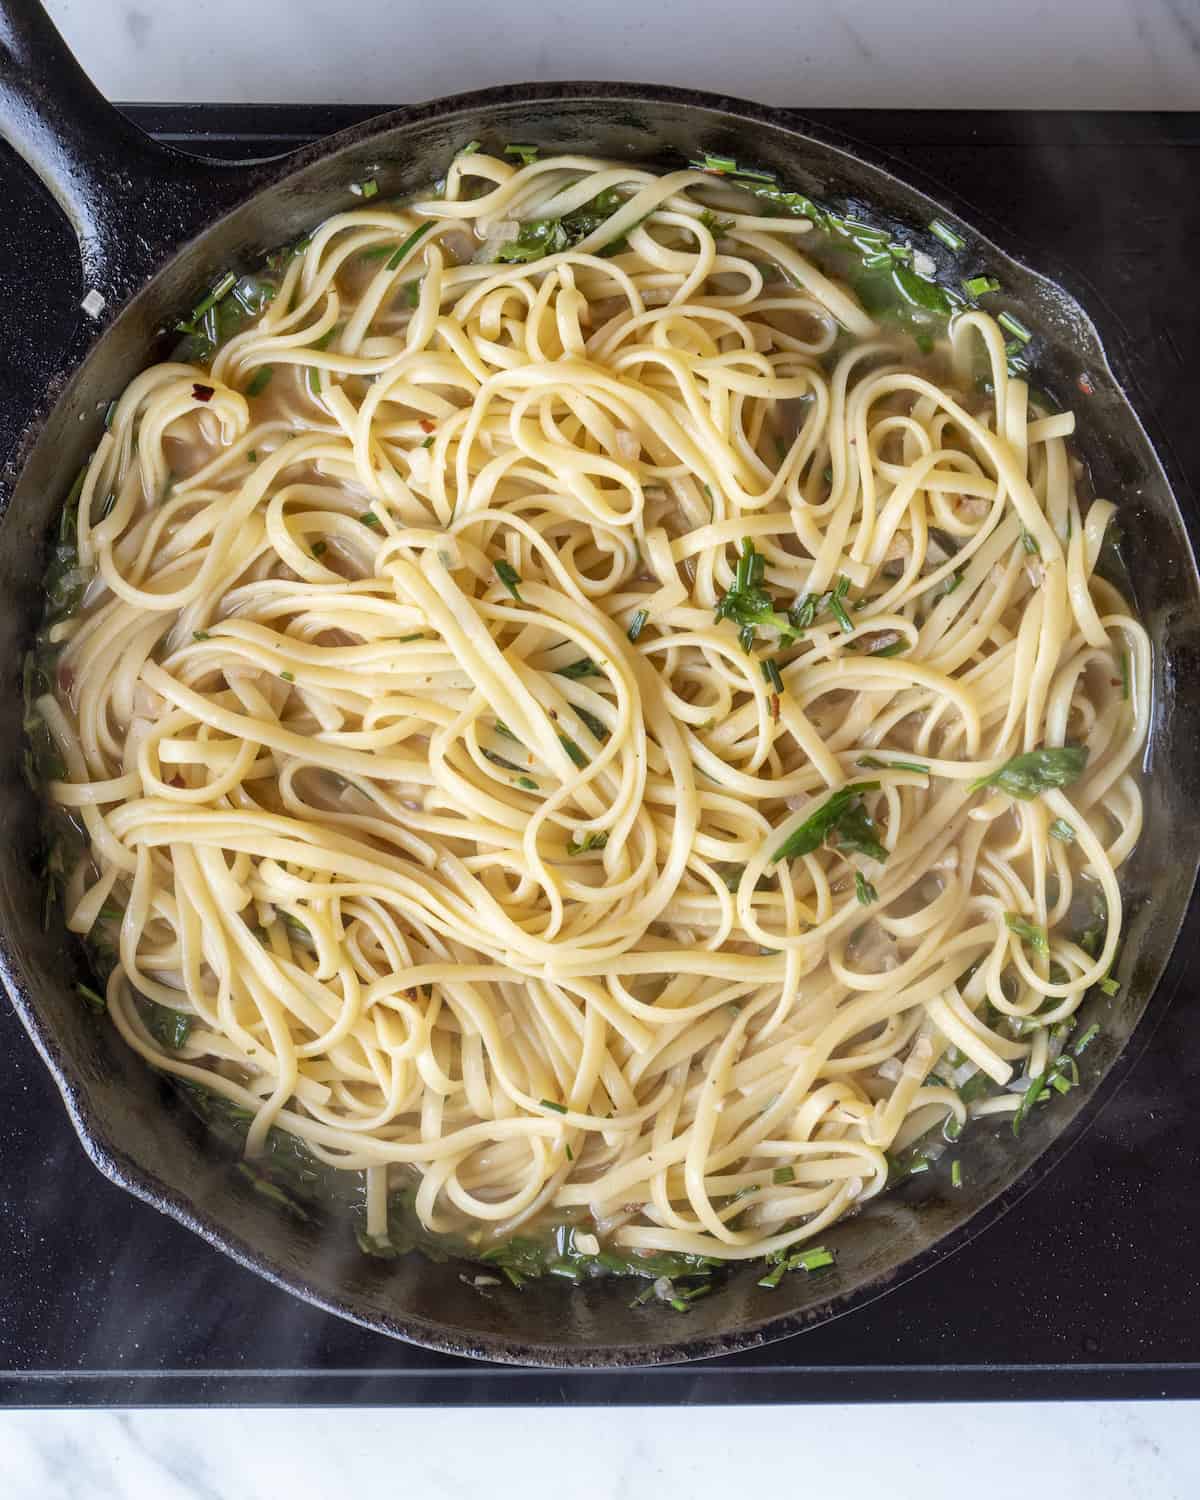
Step 6: Add the cooked pasta and cook for about 30 seconds, just to combine and let the pasta soak up the sauce. Nestle the scallops back into the skillet to serve the Scallop Pasta.
Tips & Tricks
1: First - you need to remove the muscle from the scallop. You can ask your fish monger to show you how! If scallops are readily available at your local markets, I've had a lot of luck ordering them (and seafood in general) from this Alaskan company!
2: Make sure your scallops are DRY. Pat both sides dry with a paper towel. That's going to get you the best color.
3: Season liberally with salt and pepper.
4: Use a cast iron skillet and crank that heat. You want the pan to be hot before you place your scallops into the pan.
5: Make sure you use a thin coating of oil so really get that good sear and lock in the flavor. Too much oil will splatter but you want the pan to be coated so nothing sticks.
6: Don't futz with them. Place them in the skillet and let them really brown before flipping. Don't peak or move them around. They only need to be flipped once, and when it's time to flip them, they should be so golden that it's really easy to flip!
FAQs
What do scallops pair well with?
My favorite way to serve scallops is with with pasta or over a salad like an avocado corn salad.
How do you know when scallops are done?
If scallops are firm to the touch then they are overcooked. If you touch them and they are mushy they are undercooked. Look for them to be golden brown on the outside and opaque in the center.
More Amazing Scallop Recipes

If you tried this recipe, please leave a 🌟 star rating and let me know how it goes in the 📝 comments below. Thanks for visiting today!
Lemon Garlic Scallop Pasta
Equipment
Ingredients
- ¾ pound linguini
- 1 pound scallops
- Kosher salt and freshly ground black pepper
- 1 tablespoon olive oil plus some for drizzling
- 3 tablespoons butter divided
- 4 cloves garlic chopped
- 1 large shallot finely chopped
- ½ teaspoon crushed red pepper flakes
- 4 sprigs fresh thyme leaves removed and chopped
- 1 cup white wine Sauv Blanc
- 1 cup seafood stock chicken stock will work too
- 1 cup fresh basil torn
- ½ cup chopped chives
- 1 lemon zested and juiced
Instructions
- Cook the pasta to package directions. Hold off on starting the scallops until you drop your pasta.
- Remove the muscle from the scallops and pat dry with a paper towel pat. Season the scallops heavily with salt and pepper.
- Preheat a large skillet (I like a cast iron skillet for this) over medium high heat. Add the olive oil, once shimmering, add scallops. Sear the scallops for 2-3 minutes on each side until super golden brown. The last minute, add 2 tablespoons of butter and baste the scallops, then remove from pan and tent loosely with foil to keep warm
- Add an additional drizzle of olive oil to the skillet and add the garlic, shallots, crushed red pepper flakes, thyme, salt and pepper. Reduce heat to medium low and sauté garlic and shallots 1 to 2 minutes, stirring constantly. Add wine to the pan and scrape up any pan drippings. Reduce the wine for 1 minute, then add seafood stock. Continue to cook for about 1 minute. Add the basil, chives, lemon zest and juice and the remaining 1 tablespoon of butter and stir the mixture until the butter has melted. Add the cooked pasta and cook for about 30 seconds, just to combine and let the pasta soak up the sauce. Nestle the scallops back into the skillet to serve.


Man, I almost blew it by using the wrong pan, but at the last minute I transferred the scallops to my cast iron and saved the day! Really got the sear right. So good:)
Turned out great! I actually bought frozen scallops and didn't realize til I had them defrosted that it was only 12 oz rather than 16 oz. I had to do some quick math to make a 3/4 serving, but it still ended up being plenty for me and my wife. I've done scallops more than a couple of times, and all of Gaby's tips for cooking scallops are spot on. One trick I use is that to cook them all consistently, I'll arrange the scallops on the pan like the numbers on a clock, starting with my 12 o'clock scallop down to 1,2,3, etc. This allows you to know how long a scallop has been on the pan with just a glance. When it comes time to Flip or remove them from heat, you just follow the clock and it ensures that they all get a similar cooking time.
Great flavor! Thank you for the inspiration. I think I'll reduce the liquids to a total of 1 cup, and the lemon zest and juice to a half next time, otherwise it seems too soupy. I added some pasta cooking water to the sauce, but it still took a while to cook down to a satisfactory consistency. Worked well with thawed out scallops. Will try more chives next time. Yummy!
Great recipe! Really tasty. Be sure to get the freshest, highest quality dry scallops you can find. I made the recipe exactly as directed and it was a huge hit. Great advice to use a heavy hand with the salt and pepper. Saving this to my favorites!
I made this with dry herbs, including basil flakes...& it was amazing! Having fresh basil & thyme would have been better. I would make this again & have the fresh herbs available. The red pepper flakes added a nice kick. Yumm
Loved it Thank you Gaby
I made this with a girlfriend the other night and it was INCREDIBLE. I always get a bit nervous with scallops because the texture can be off-putting if not cooked properly. Your tips were so helpful and they came out perfectly and the flavors in the pasta were truly amazing. I will 100% make this recipe again...and again 🙂
Absolutely delicious. I didn't have the chive, shallot or basil in the house so I improvised. I used red onion finely chopped in place of the shallots and chives and used sautéed spinach in place of the basil. My husband said, "This recipe is a keeper!" Can't wait to make it again. I think I am going to try using this recipe with shrimp also. Easy to make. I would suggest having all the ingredients prepped and ready before you start cooking, since it is a quick cook recipe.
The tip about patting dry the scallops made all the difference. My scallops never came out looking so seared! Everyone raved. Thanks Gaby!
A reular in our house now.
Absolutely delicious -= with homemade artisan bread -- awesome meal! Thank you!
I made this two weeks ago. My husband just asked me to make it again! I didn't change the recipe at all. This is perfectly delicious!
Realizing that the cooking time would need to be adjusted is it ok to use bay scallops instead?
totally
Amazing! Dinner party worthy!
Delicious! Added a bit of cornstarch and water to thicken the sauce at the end. Thought there would be too much herbs but it was amazing!
Well done Gaby!!!!!